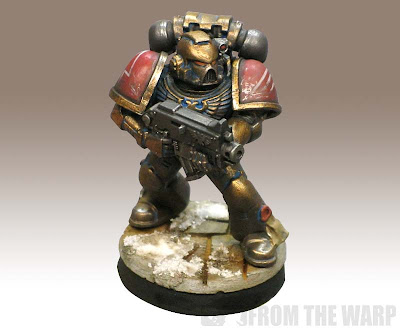

With Forge World releasing their new resin Minotaur shoulderpads and getting an email from a reader about painting Minotaurs, I thought I might see how hard it would be to paint the new "bronze" color scheme Forge World has them wearing now.
The best part of this whole thing is I found the perfect use for my pot of Tin Bitz that has been lying around for ages.
The actual painting process is fairly quick
Once you have your guy assembled, it's a quick prime of black followed by a good basecoat of GW Tin Bitz. You don't have to worry about where you get it either, just slap the stuff on.

Once that dries, it's a liberal wash of slightly thinned GW Hawk Turquoise over the whole model. Again, no need to worry about where it goes. Just make sure you cover the whole model (Step 1). Make sure that has time to dry completely before moving onto steps two and three. Once your Hawk Turquoise wash is completely dry, take your Tin Bitz and give the model a good drybrush of the basecolor again (Step 2).
They key with this step is to make sure your larger armour plates get good coverage. After your done with that, it's a matter of one more drybrush of Folk Art Metallic Solid Bronze (step 3). I think this is close to GW Dwarf Bronze if memory serves me correct.
Apply this final lighter bronze color to the upper portions of the model only where the light would hit the surfaces. This is in effect our highlighting on the model. It also gives the model a warmer look than just having the Tin Bitz on there.
And that's it for the amrour. Simple as that.
The rest of it is a matter of finishing off the details on the model.
The details bring it to life
I will add that it's worth going in and adding some shadows to the deeper recessed areas on the model. This helps with defining the armour plates and removing a tiny amount of the patina effect so it's not too overpowering. We go heavy with the effect in the beginning so we can remove it as we want. It's easier than trying to build it up at this point.

In this picture, you can see where I took and applied a quick wash of GW Badab Black. It's only in the deepest recesses so it helps with the overall shape of the model.
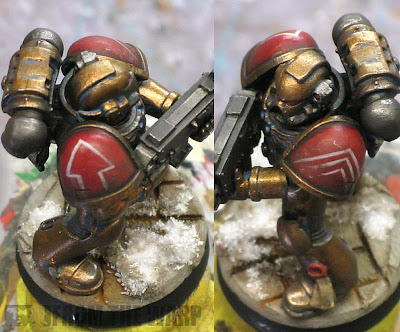
When it came to heraldry, I had to sort of make it up since I don't have the latest Imperial Armour book yet. I chose the red shoulderpads as a way to break up the huge amount of bronze on the model. I don't know the significance of the red, but it comes from IA10 so it must be good right?
The red started out as GW Foundation Mechrite Red with a thin layer of GW Red Gore and a wash of Baal Red to darken it down. I didn't want it to pop out on the model and compete with the gold so I kept it really dark. Badab Black carefully applied around the trim really made it darken down considerably.

I'm guessing he's got a tactical Squad arrow outline on his right shoulder and some kind of Veteran status markings on his left. Both are easy enough to do, the only thing you have to be careful of is working over the completed (highlighted and shaded) shoulderpad... any mistakes and you'll be stuck painting the whole thing over again. Freehand shouldn't scare you away if you know what to watch for when doing it.
The trick was to lightly draw the markings with a pencil and then go over that with the paint. The pencil is just dark enough to see, but comes off easily enough with a damp Q-Tip when done.
Some additional weathering
I did go through and apply a few powders to some key spots and used a pencil to add some wear and tear along the more prominent edges of some armour plates. The pencil is a great effect and quick too. The powders I used in this case were Exhaust Black (around the lower portion of the shoulderpads) and Metallic Iron (on the backpack and boltgun). Both are from Secret Weapon Minis.
The pencil weathering technique is explained more in this post here.
The base and slushy snow effect
The base also comes from Secret Weapon Minis and I decided to try making what I thought would pass for slushy snow. Actually, there's moss molded onto the base and I could not find my moss material to save my life. These are the same bases the Storm Wardens team used and I've always loved how they look.
The snow itself comes from Gale Force Nine. All I did was apply some white (PVA) glue to the base and sprinkle the stuff on. After is was dry, I went in with a slightly diluted GW Devlan Mud wash and dabbed it onto the snow in a few places to make it look like it's picked up some of the dirt from underneath it.
There are lots of ways to do snow, here are a few more here.
And last but not least, the banner

Just click and save it to your desktop. Print it out from there to the size you want.
All in all, this guy came out better than I thought he might. I was worried at first about getting the right amount of patina on the armour, but it came out okay in the end.
I'm still partial to their old school look, but the new bronze doesn't look too bad either.

I skated out of painting the new Minotaur chapter icon when I posted this Minotaur Space Marine model I painted a few months back. After getting a few requests on how to paint the actual chapter symbol and not the shortcuts I did, I thought I might give it a go to see just how hard it would be to duplicate in freehand.

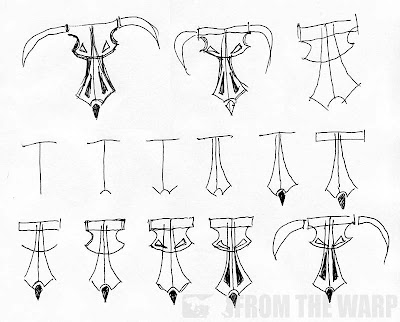
My initial impression was that it would be fairly easy to do and I was close. It's not hard to do once you know how to break it down into shapes, it's just keeping track of a few key spots in order to get the right feeling to the iconography.
I sat down and sketched it out a couple times until I knew I had a workable process that I could reproduce with my paintbrush on an actual model. Not that it would be super easy, but it was doable.
I decided I would be adding this (my freehand work) at the end of my painting in order to keep the overall model painting time down to a minimum.
You can do your freehand before or after you paint your model, each has it's pros and cons and it's worth considering both methods. I discuss that very thing in this post on when to do your freehand work.
I started out by painting up a shoulderpad in the bronze/gold look the models would have so I could see how the final freehand would look over the real basecolor. I used the same method I did on my previous model. It does me no good to paint it on something grey only to find out it (the colors I chose) don't really work that well over a bronze metallic basecoat later on. This way, I could modify either part so the end result was what I was looking for.
Here's where the problems started
And I hit the very problem I anticipated. Trying to get this detailed of an image to look good over a metallic color is near impossible for me. What I needed to do was repaint my base color as a light brown in order to make the icon stand out. The background color needs to be a flat color or better yet, non-metallic metal for this icon to work the best I think. That can add considerable time to painting your models and slows everything down. NMM is not something you're going to crank out quickly nor is it something I want to do on a few dozen shoulderpads.
Once I had it (my shoulderpad) repainted with my tan instead of bronze, it was a matter of following the steps I came up with and "building" the overall shape of the minotaur head. Note I said build it and not try to draw it outright in one pass. By building it from smaller shapes, I'm able to reproduce it consistently each time I go to do it.
The few areas I found I had to watch out for were the length of the nose compared to the width of the top of the head. You don't want him to have too short of a nose so you need to make sure the top of the head is the correct width in relation to the icon's height overall. Another problem is the amount fine line work on the image overall. This is not simply a blood drop or a simple tactical squad arrow.
Painting this icon will try your patience to say the least.
I ended up breaking out my fine tipped drawing pen to help with some of the line work. My brush could do it, but the more I worked on the image, the more I found myself looking for alternatives to painting... like not doing it at all.
So what's the verdict?
You certainly can paint your Minotaurs chapter symbol onto every shoulderpad. I'm not ever going do it though. I'd paint it onto my vehicles where I had a larger area to work on and my linework did not have to be absolutely perfect. When it comes to troop shoulderpads though, it's decals (which I don't do that often myself) or most likely casting.

Check out the two part shoulderpad mold making and casting series here.
I'd even go so far as to say that you could paint the icon normally over a regular metallic background as long as it was sculpted onto the surface. The added texture would help it stand out and the use of a wash or two around the edges would help make it pop out as well.
So there you have it. Don't try and freehand this icon (especially if you have lots of them to do and by that, I mean more than one) unless it's large and on a vehicle. For troops, it's decals or casting. And if I went the casting route, I'd make my own larger sized, low relief icons for my vehicles too in order to add some texture to the flat surfaces.
In fact, I'm going to sculpt one and paint it up to see how it turns out.
I'll post the results later this week.
And there you go! A huge thanks to Ron for letting me post this and who knows maybe there will be some more guest posts from him soon (be sure to go look at his blog). I hope you all enjoyed it? If you did why not leave me a comment below as it really helps out.
Until next time.
