Tau Supporting Fire
When an enemy unit declares a charge, all friendly models with this special rule in units within 6" of the charging unit's target can choose to fire overwatch as if they were also targets of the charge.
By Chris Vinton
Support fire is a unique rule to the Tau Empire. This rule highlights the old saying "the best defense is a strong offense." If your list depends on this rule to win games your deployment is crucial. Layers of units and exact deployment both make and break this tactic.
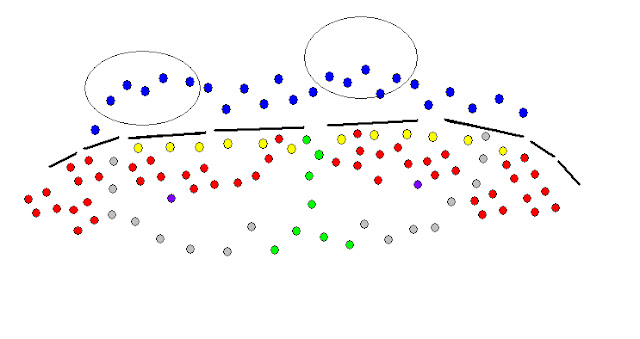
The above diagram is my general deployment. Here's the Key to the diagram:
Circles- area terrain
Lines- aegis line.
Blue- Kroot
Yellow and red- fire warriors
Grey and green- pathfinders.
Locally, we play with terrain set up and with that I typically try to put a piece or two of area terrain in front of my defense line. This slows attackers and gives my kroot a little cover. Typically I try to avoid forests but since most of the time I'm not shooting my ap 5 guns at much low armor stuff I don't care about that 5+. Not to mention if I do care, I'm ignoring cover any how.
 The kroot play a role much like in 5th Ed. They absorb a charge and bubble wrap the line. But more importantly, because they are such a big footprint I can spread them wide across my gun line. This does two things. First it casts a wide net to get a majority of units in support fire range. I do my very best to get every unit in and I find it pretty easy when the kroot are spread out. Secondly, it prevents multicharge. If I need to I can stagger these guys a little tighter to close up my 1" gaps to keep enemy units from slipping through and getting my all important fire warriors.
  The fire warrior is the bread and butter of my list. The change to rapid fire shooting full range on the move allows me to sit and wait for the charge or press my gun line forward without losing any effectiveness. A lot of people have commented about a lack of mobility and to that I just say "I walk there". Most of the games with objectives I've managed to get all except the most back field of objects. And in those cases I've put some outflanking kroot onto them. (If I face a gun line I take the kroot bubble wrap out of my deployment since I won't need it).
  The pathfinders are the unsung hero's to the formation. They get the the ball rolling on overwatch. Even on snap fire I can easily put 4 or 5 marker lights on charging units. Then inflict some serious damage with ethereal supported fire warrior overwatch.
  The skyray gets tossed in my formula depending on deployment. I didn't put it in the diagram but generally I don't push it too far up despite having the support fire wargear on them. It's more of a tool box option that if I need it I have it. I also don't push it because until it gets brought up in a FAQ I can't say if marker lights can be fired. The warhead specifies that the vehicle can overwatch with guns strength 5 or less. So the twin linked smart missiles are in but the marker lights don't have a strength so I'm not sure if they are allowed or not. Time will tell.
 Lastly, the Ethereal is the key to the success of Support fire. He adds an extra shot to any squad within 12" firing at half range or less. That really starts to stack up in the formation when you have 3-5 squads in range. He also adds a leadership bubble throwing out Ld 10 to the squads. Very big, but at a huge cost- gives up an extra VP. This can really make him a massive target for the opponent (and should). Be very careful as this guy can really punish you with the wrong match ups. Vindicare assassins wet dream right here.
 Generally, this guy is played with evoking the 6+ FNP on first turn. Kind of a why not. Only time I don't is if I think I might be getting charged first turn, then its fire so I can get the extra shot in overwatch. Otherwise, I've used them all in the right situations and I think it's important to not get pigeon holed into thinking evoking fire is your only option. Snap firing after running is great for when you need to get to objectives, FNP is good when the opponent will be out of half range and you're going to be in a fire fight. I still haven't gotten a lot of use out of stubborn...but maybe I'm missing something.
 However you run him, this guy is the tool box made of glass. People still haven't really gotten on board of killing him ASAP, but I'm sure like the Dark Angels banner, they'll figure it out.
For right now, I really like how the gun line works. I'm not seeing Farsight bomb being that amazing or massive amounts of suits. The command node is very cool, but I see it more as a ally into Eldar or Marines. For my play style this build should take me as far as I can go with it. I love having a death zone of untouchable combined with my big threats of Rip Tides. It really gets the job done in a very effective way.

