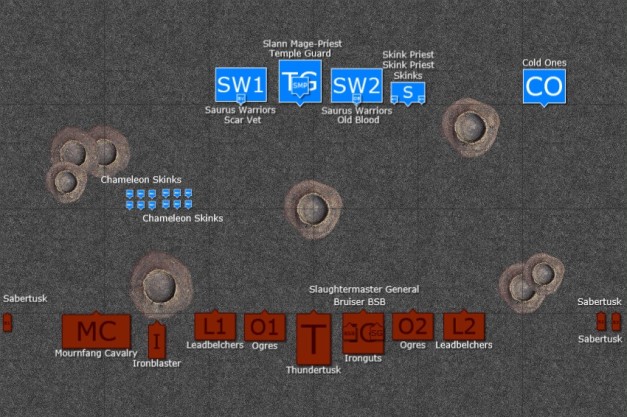
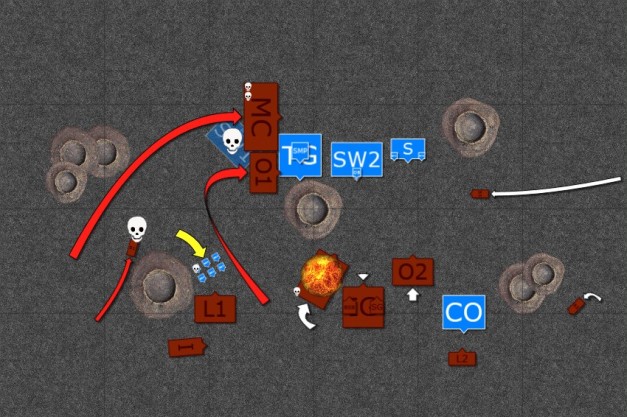
So Andrew and I managed to throw down in another WHFB match (well, the first 1/3rd of one) the other night. A 2500pt game with my Ogres, but tired of seeing his Daemons fall to my big-bellies, and hot on the heals of a decisive victory against Ray’s Vampire Counts with his lizards, Andrew brought out the Lizardmen. I haven’t seen them across the table from me in a while, so it was nice facing my Skaven’s old nemeses again. Let’s see how the Ogres can fare against this scaly foe…
Ogres
- Slaughtermaster General, Level 4 Maw (Bonecrusher, Trollguts, Bullgorger, Braingobbler)
- Bruiser BSB
- 8 Ironguts
- 6 Ogres
- 6 Ogres
- 4 Leadbelchers
- 4 Leadbelchers
- 4 Mournfang Cavalry
- Sabretusk
- Sabretusk
- Sabretusk
- Thundertusk
- Ironblaster
A last-minute points level change brought my 2400pt list up to 2490 with the addition of another Mournfang and Bellowers for the Ogre units. I didn’t question the fact that it’s 10 points shy of 2500 at the time, but I’ll ask Andrew. Maybe it was supposed to be 2500 and I didn’t add 10 more, or it’s just some weird number game he’s playing here. Anyway, my ‘test’ for this game are the Sabretusks. This is my first time using them, but sadly I had to use proxies as my counts-as-Sabretusks Fenrisian Wolves are built, but currently baseless. I’m actually using Andrew’s Seekers of Slaanesh, as they were at hand! Weird. Lastly, knowing I was going to face a Slann, I probably shouldn’t have spent so many points on a Lv 4 Slaughtermaster, knowing the Magic Phase was likely to be Lizardly-dominated. Maybe next time…if there will be a next time, depending on the outcome of this game!
Lizardmen
- Slann Mage-Priest General & BSB, Lv 4 Life (Awakening of the Wood, Flesh to Stone, Throne of Vines, The Dwellers Below)
- Oldblood
- Scar-Vet
- Skink Priest, Lv 1 Heavens (Iceshard Blizzard)
- Skink Priest, Lv 1 Heavens (Iceshard Blizzard)
- 23 Saurus Warriors
- 23 Saurus Warriors
- 19 Temple Guard
- 6 Chameleon Skinks
- 6 Chameleon Skinks
- 8 Cold One Cavalry
I can forgive Andrew giving his Slann the awesome upgrades and the Lore of Life, after all he’s been through against the Ogres. This list is pretty different from what I’ve faced in the past, as instead of Salamander support he’s beefed up his Saurus units with a fighty Lord and Hero, one in each unit. And I’m glad he’s using the cavalry, as I’m a strong believer in mounted units. Although facing them is never fun.
Setup & Deployment
So the scenario we are using is based on one I found recently while rummaging through my collection of White Dward magazines from a couple of years ago. I’ll find the exact issue and offer more details next batrep entry, but I removed the objective and just kept the lava-filled craters. So now we’re fighting the First Battle of the Volatile Wastes, where each Shooting Phase one (or up to 3) of the lava geysers will fire off a large template, deviating with the Scatter and Artillery dice, that deals a Strength d3+2 wounding hit on anyone touched. The crater terrain pieces are Deadly Terrain, meaning you can’t move over it, or else you die. Pre-emptively, I think I’d prefer being able to move over it, but the models would suffer a S5 hit, and maybe another at the end of the turn if they are stuck on it. And maybe auto-removed if they Flee onto it. But that can be decided after the game if we like/don’t mind these terrain features. Oh, and otherwise, it’s just a straight up Battleline scenario.
Turn 1 – Lizardmen
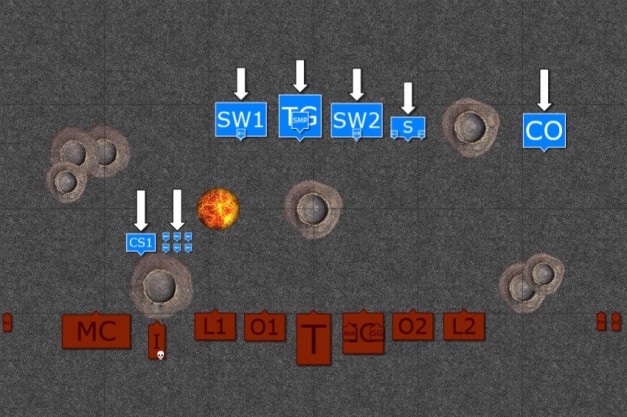
The entire Lizardmen battleline moved up, just about 4″ or so, being cautious. The Chameleons got right up to the crater’s edge, and aimed their blowpipes at the Ironblaster.
The Winds of Magic roll was pretty low, although I did get a Channel. I don’t recall what else was attempted, but I did use my Scroll to Dispel Dwellers Below that was cast on my Ironguts.
The middle crater shot a lavaball that landed without incident. Hey…why are those Skinks shown individually again…weird. Anyway, both Skink units shot their 24 dice at the Ironblaster, but after only 3 or 4 hits I saved all but 1 and took a wound.
Turn 1 – Ogres
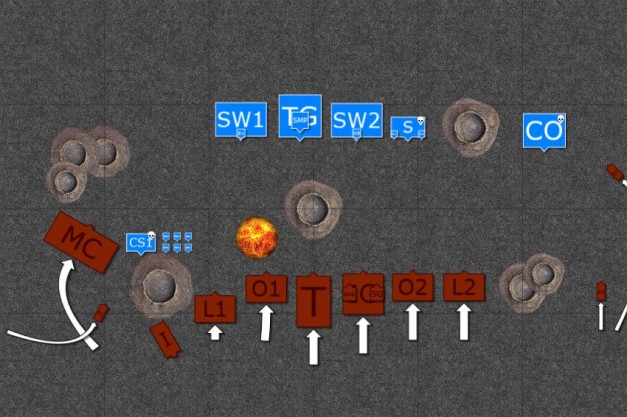
The Ogres moved up, but I later thought I was too cautious. I shouldn’t worry about getting the Charge, as even though my Ogres are extra-dangerous when Charging, they’re not brittle otherwise like chariots. Next time. That first Chameleon are totally blocking my Mournfang, which is annoying. Maybe I shouldn’t have gone 4 wide?
The Magic Phase was a dud, other than knocking a single Skink off the board with Bonecrusher.
The lavaball once again came from the centre crater, and was once again harmless. Speaking of harmless, all my shooting managed was a dead Chameleon and a dead Cold One. That’s after 17 shots from each Leadbelcher unit, the stone thrower and harpoon shots from the Thundertusk, and the useless Ironblaster that Misfired and spun around. At least it didn’t blow up, I guess. I believe the Thundertusk’s stone thrower shot was also a Misfire, but thankfully that just results in ‘nothing happens.’
Turn 2 – Lizardmen
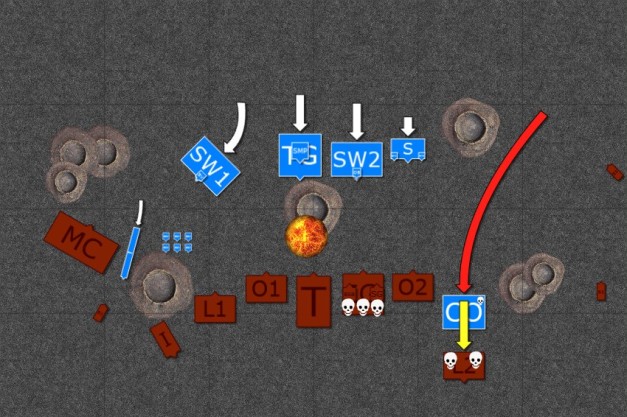
The Cold Ones Charged into the Leadbelcher unit. Most everyone else just moved up, with the Chameleons congo-lining between the Mournfang and the crater and the Saurus Warriors failing a Charge on the Mournfang. They had spears, though, so they don’t mind accepting the Charge. Andrew had to make a decision about the Chameleons, to either keep them blocking the Mournfang or trying to get them into my back lines. He decided on the latter, but a failed “Enemy Sighted!” March test meant he didn’t get too far back there. At least they could all still shoot at the Ironblaster.
Here comes one of those annoying Magic Phases! He rolled an 11 for Winds of Magic, so things were definitely going to get ugly for me. He put up Throne of Vines, which I let through. He put Flesh to Stone on the Cold Ones (along with Iceshard Blizzard on the Leadbelchers from one of the Skink Priests), and then I failed to dispel Dwellers, and they swallowed 3 Ironguts! Come on! I hope I can make him pay for that (and all the other Dwellers he’s going to hit me with during the next 4 turns!).
After having to reroll the dice a few times, the centre crater (again!) falls harmlessly (again!). I manage to save all of the Chameleons’ shots on the Ironblaster again.
In Close Combat the Cold Ones managed a total of 8 wounds on my Leadbelchers, just failing to drop a third body. The Leadbelchers do manage to kill 1 Cold One (after -1 to hit AND facing Toughness 8 and a 3+ armour save), but end up Fleeing and thankfully don’t get caught.
Turn 2 – Ogres
I Charge the Sabretusk into the Chameleons, which ranks them up, still in congo line format, but at least giving the Mournfang room to get behind them and into the Saurus Warriors, which they do. Thankfully the Sabretusk was within Movement distance of the Chameleons, or else he’d likely be shot dead on the way in. For Lizardmen players’ sake, I hope they make blowpipes Quick to Fire in their next book. The first Ogre unit also Charges into the Saurus Warriors, getting a flank Charge. I should have sent the Leadbelchers into the other Chameleon unit, but I didn’t think about it until the Shooting Phase. The other Leadbelchers rally, and the rest of the army shuffles up or around. Oh, the Ironblaster did manage to line up a sweet-arse shot at the Cold Ones, right across the flank. Ooooh!
I’m pretty sure nothing happened this Magic Phase. Yup, he dispelled everything easily. Actually, he dispelled Trollguts on the second Ogre unit with an exact match of my roll. Annoying!
So, once again the centre crater fires off its lavaball, but of course it lands right on my Thundertusk, and deals it a wound. Oh don’t worry, there will be more pain this phase…and it won’t be for the Lizards! So the Leadbelchers managed a measily 1 wound on the Chameleons, again. I forgot (even though it happened just a turn ago) that shooting at Chameleons are extra hard, which is why I should have just Charged into them. The Thundertusk takes aim and once again Misfires. The Ironblaster also takes aim with that sweet shot of his and…Misfires. That’s right, Misfires. Again. Now I’m 0 for 4 on the Artillery die this game! Wow! This time the Ironblaster gets clogged up and it’ll be 2 turns until he can fire again. Bull!
But I will have my revenge in the Close Combat Phase. So after Impact Hits are resolved, there are 7 dead Saurus Warriors. The Scar-Vet attacks, and fails to do anything. Then all my guys attack. That ends up being 30 Strength 4 Attacks and 16 Strength 5 attacks, looking for 4s to hit and 4s or 3s to wound. These peel off a measily 10 more, I believe (or maybe more died here and less died from Impact Hits, I don’t recall exactly, but the outcome is the same). The surviving 6 Warriors attack, deal a piddily 2 wounds to my Mournfang, and then lose 2 more to Stomps. Unfortunately for the Saurus Warriors and their Scar-Vet leader, they cannot roll double-1s with Cold Blooded and the reroll and Flee. Not only do they get caught (netting a 300 or so point loss), but both the Mournfang and the Ogres crash into the flank of the Temple Guard. There is relief in that only one Mournfang manages to hit the unit, although I’m not sure if I did that right. Maybe as they were destined to hit the Temple Guard, I could have maneuvred the units so that more Mournfang would hit them. I should check it out. Although Andrew is hating on the monstrous cavalry enough as it is, so maybe I shouldn’t push it. I can’t afford to lose Andrew as a gaming buddy! Elsewhere, the unengaged Chameleons watch their friends get slaughtered and Flee, ending up right in front of the Leadbelchers. The other Chameleons lose 2 to the Sabretusk, don’t wound back, Break, Flee and get rundown.
Intermission
So, in the end not a good beginning for the Lizards. The early going was just fine, with Turns 1 1/2 going well for them. Up to those two combats, I had lost 3 Ironguts, 2 Leadbelchers and took a few other wounds, and all he had lost were 2 Chameleons, 2 Cold Ones and a Skink. But as is the norm these days, the game tends to swing widely from one direction to the next. This is something that Andrew is not happy with. We’ve had many long chats about this, including one at the end of the turn and before he left. While we did not play the earlier editions of the game, it seems as if drastic swings like this are somehow built into the game. He definitely hates my Mournfang, probably tied as Most Hated Enemy with the Vampires’ Blood Knights, which seemed to do as much damage to his lines as the Mournfang. Poor guy. Although I don’t feel bad, because with a snap of his Slann’s froggy fingers he can drop 3 of my Ironguts (129 points!). I guess my way is more satisfying, because I get to roll a shat-tonne of dice.
Anyway, he’s not completely demoralised yet, although I have a feeling that I’ll be fielding the Skaven in our next WHFB game and saving the Ogres for other opponents. He doesn’t want me to, but like I said, I can’t afford to lose him as a gaming buddy (no, it wouldn’t come to that, but I do want him to have fun). But between our recent WHFB, Warmachine and Star Wars LCG games…I’m surprised he even talks to me!
Hopefully we’ll get the rest of this game played soon. I’ll continue the batrep as soon as that happens.
Thanks for reading.
