Painting the perfect red.
I don’t want to paint any old red. I want the red. The perfect red. The transcended red of my inner mind as I see the Legions wage war.
Just as I don’t want to paint Sons of Horus in any old green, the Emperor’s children in any purple. I need the perfect colours; but perfection depends on perceptive. My perfect red is composed from all sorts of influences, from childhood memories, art, imagining battle scenes and the how other people have painted their miniatures.
I think the Horus Heresy favours a realistic approach to painting these miniatures. Paint chips, scored armour, oil weathering and rust effects are prevalent in the painting scene (but that’s not to exclude other styles which look equally effective on these awesome models). But without a good base to work from these techniques can feel superfluous. Back to the original question; how to paint the perfect blood angel red?
White Dwarf run a series of articles on how to paint Space Marines when the original RTB01 kit was released. I’ve included a scan here, but I’d urge you to seek it out as it covers how to Ultramarines, Space wolves and Salamanders. It is interesting to think how different 40k would be if GW decided to develop the Salamander range instead of the Dark Angels into a full blown codex. Guess we will never know...

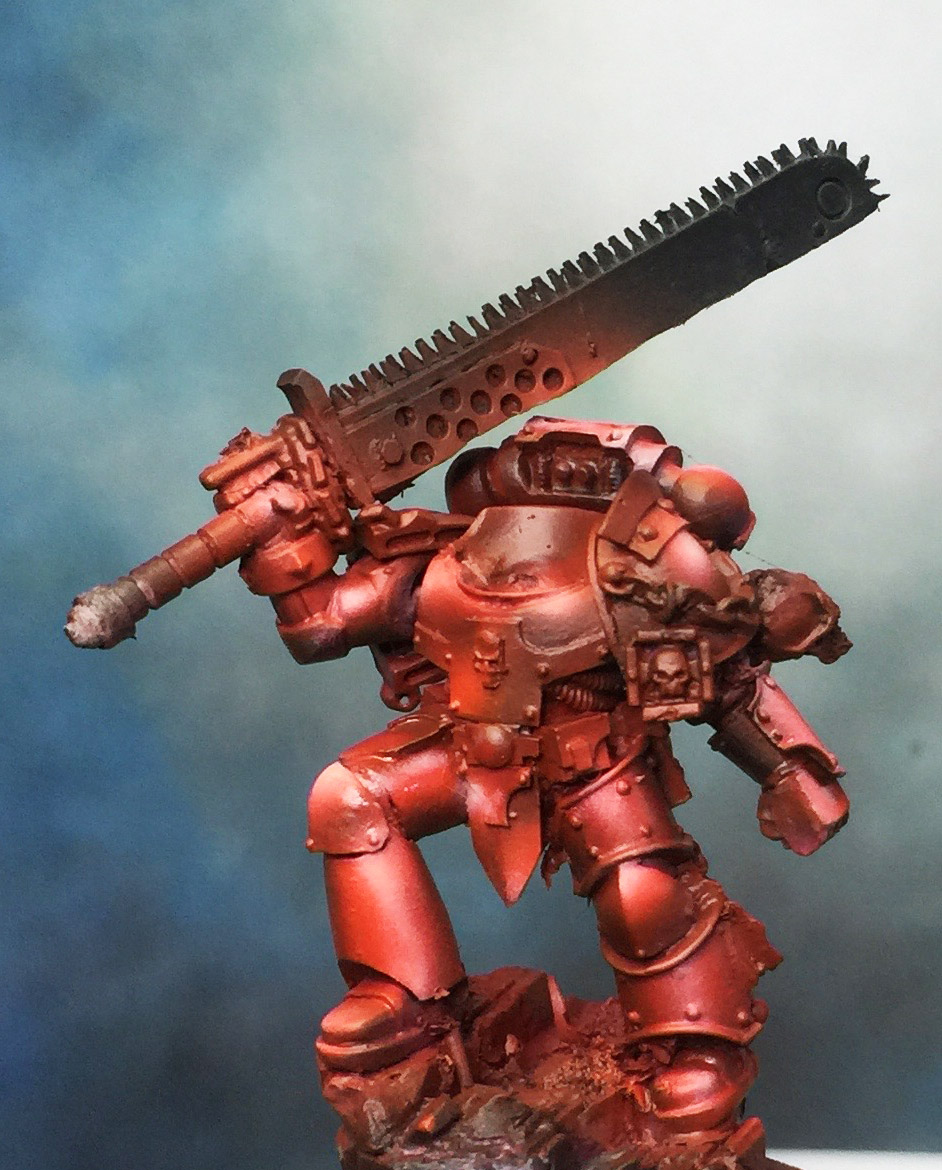
Here is my attempt to recreate this paint job with paints available to me today. My classic Rogue Trader Blood Angel:
Step one

Easy enough to start. Prepare model, and spray white. No difference.
Step two

As it so happens, I am lucky enough to own an original pot of GW terracotta that had not dried up. It took several thin layers to get a good, solid coat. I've found that GW's current merchite red has a similar pigment, but if your the pedantic type, add a little vermin fur in the mix. For an equivalent in other ranges try using formula P3 Sanguine base or Vallejo’s Gory Red. Paint equipment, backback (I forgot to add it to the marine when photographing), tubing, accessories black.
Stage three

Drybrush pack and weapons boltgun metal. You will notice that GW produced a colour called Blood Angels Orange and not red. However, since the guide calls for the orange to be mixed with Terracotta, I just painted all raised area's of armour with Blood Red. VMC Bloody Red or P3’s Skorne Red for alternatives.
Stage four

The highlighting stage is really bizarre. Drybrush any metallics surfaces as described above - no problem. The red armour: first highlight with a mix of Blood Angels Orange (just add a touch of Blazing Orange/ Vallejo Orange Fire/ P3’s Ember Orange to Blood Red) and Sunburst Yellow (any lemon yellow will suffice). I moved from a 70:30 mix to a 50:50 (sunburst yellow is pretty transparent when thinned down, so I would use this as a wash to 'taint' the edges of the armour), then added white. White? I didn't understand it either. I thought that the mixture would be tinged with pink (which it was) and ruin the highlight (it didn't, but you have to perform this stage sparingly).
When I mixed white in, it created a colour similar to elf flesh, which I used to highlight the very extreme of the armour plate. If you make a mistake, and make the highlight too extreme, use some Sunburst Yellow to wash over it and try again.
Stage five

At this stage, you've done the donkey work; time to tidy up. Black line all the recesses in the armour, paint the eyes green, then paint on chapter symbol and squad insignia (interestingly, since most of the old models had a studded left shoulder pad, chapter and squad insignia were often represented on the same pauldron - see above for Blood Angels Tactical).
Stage six

Base. In contrast to he sand base above, I've really gone old school and based my marine with classic goblin green and green sand.
And voila - Classic Blood Angel Space Marine.
Conclusions:
I think the marine turned out ok. It has the feel of a classic Rogue Trader paint job using layering to build up highlights (no inks or washes - even though I cheated a little with the latter). I think my effort turned out a little darker than the original. I couldn't get comfortable with the highlighting at stage 4. It still feel completely alien highlighting red with white. I also think I should have made the armour brighter at stage three. However, I'm really pleased at how he has turned out, adding an unusual accompaniment to the rest of my army.
Having reviewed the old school approach lets see how we can adapt it using modern techniques.
Undercoat black. I use Halford’s Matt Black after washing all resin parts thoroughly in hot soapy water. You may not feel this stage makes a difference, but it does. Just do it or weep later.
Stage 1

Airbrush VMC over the red armour plates. Build up a smooth consistent layer.
Stage 2

Airbrush highlight VMC Fire Red. Hold the airbrush at a 45 degree angle and concentrate on painting the plates that light would hit. Think of this as a sketch - you don’t have to be too precise here, just give a general impression of light and volume.
Stage 3


Airbrush Com Medea Art Violet for shadow, Com Medea Art White for highlight. Painting over a black surface will give always give a slightly dulled effect to the final product. By introducing white here we are adding luminosity to the final armour plates and adding depth to the final red.
Stage 4

Airbrush Com Medea Art OP. Toluidine Red. The Beauty of Com Medea Art paints is that they are slightly transparent. Although one layer won’t give a consistent finish, it does give you the possibility of building layers, concentrating on highlighting and developing the complexity of tone. We want to cover the white and allow the harsh darker tones to be mellowed a little.
Stage 5


Airbrush Com Medea Art Dintirile Orange. Use your airbrush in tight banded circles to add volume to the armour plates. From this stage forward we are aiming to sharpen the details of the sculpt so colour placement is even more important. Hit areas of the armour where it would be lighter than the previous stages and work on the contrast between note red and the orange.
Stage 6


Airbrush Scale 75 White Sands mixed with previous Dintirile Orange (30/70, work up to pure White Sand).
We are painting the first band of extreme highlight. Don’t worry if this stage is a little garish as we will be knocking back the harshness of the tone with the brush.
Stage 7


From this point onward we will be switching to using the brush alone. The Airbrush has given us the basic sketch from which we can go on to refine. Use GW’s Fuegan Orange glaze and Baal wash to soften the transitions between the red and the white.
Stage 8:

Further stages are hard to photograph as you are no longer working in stages, but rather moving colour around the plates to define the shading and highlight banding. Use very thin layers of VMC Sunny Skin Tone and Scale 75 White Sands to highlight the armour plates. Keep applying this until you achieve your desired effect.
And that’s how you paint the red. From here we can do all sorts of nice things lie oil washes, armour damage, freehand etc… Essentially this red is built up from a maroon base with a blue show and an orange highlight. I think it hits all the right notes and offers a good base to go on and paint your Blood Angels.