Welcome to the first post in the new series I’m trying out. This week I’ll show how I fill gaps in miniatures and models, large or small, with Liquid Green Stuff or as I abbreviated it, LGS. Find out how you can do the same after the jump.
Here’s a list of what you will need:
- Model with gaps (obviously)
- LGS or your favorite filler product (Humbrol Filler is pretty good too)
- A spare glass of water to wet your tools
- Sculpting tool or an old brush to work the material. I prefer the metal tool, easier to clean.
- Some files, sandpaper or buffing stick
- For sandpaper I recommend getting different grit paper. I use 800 grit for first sanding and 1200 grit for smoothing to perfect finish.
- **OPTIONAL** Rubber brushes to smooth out LGS

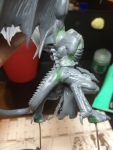
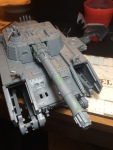
First we need to locate the gaps or bubbles on the model that need filling. For this example I’m using the Shadowsword tank I’m working on as well as a smaller, Daemon Prince where I saw some additional gaps I missed the first time.


Next to apply the filler. The general idea is that filler material will shrink once dry so you will need a little more than what you think is necessary on gaps. That said, you cannot really shovel a bunch of filler to a gap which makes the process wasteful and more importantly, you may inadvertently obscure details! Thus apply LGS as needed in layers, flattening the material on the gap.
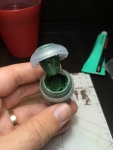
So in our example a little bit scooped from the cup is enough. I’m using the sculpting tool by Citadel, you can use any such material or whatever tool you see fit. Just remember to wet the tip of your tool in order to prevent the filler from sticking to it instead of the intended surface.


Lather this bit on the gaps in a sidelong motion over the gap, pressing with the back of the sculpting tool to flatten the filler on the surface and make move it inside the gap. So in the case of the cannon, I move the filler not in the direction of the cannon but perpendicular to it, left to right, right to left. This naturally pushes your material in the gap and makes the excess pop out the sides.
LGS dries very fast, actually faster than Green Stuff you would prepare from the epoxy yellow and blue. For this reason you need to work fast with the filler and let it dry, if you keep fiddling with it because you do not like some part, you risk tacking the whole thing off with your tool, in which case you need to flatten the filler again on the surface. Just work it in and let it dry.
In some cases the material needs to fill a large gap or there is a misaligned piece that you need to correct. Here you can apply the filler in layers, building up from the gap towards the surfaces you want to blend. This is called bridging and is needed especially on larger joins such as armor plates, plane fuselages or in our example, the Daemon Prince’s tail. If you think the end result is too high from the original cast, you can always sand back down.


Right. Now you have your filler doing its thing in the model, you need to wait ideally overnight if you worked at night but I went ahead and probed some of the smaller joins I mended. As said LGS dries fast, your mileage may vary with other fillers. I would definitely wait about a day for Humbrol filler for example. This makes the filler dry to a crumpling consistency which is great for sanding. So go grab a coffee, play some video games or watch a movie.
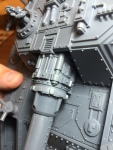
Once the filler is dry, you can test the filler with your finger. The excess pieces will drop off without leverage from the mended surface. However we want to have a clean, smooth finish for a nice paint job and for that you need to even the surface. Time for sandpaper or file to join the fray. In my example I have larger mends that can be reached with a sandpaper, so I’m using the 800 grit for initial cleanup.


The finished sanded models should look a bit like this:


Final tip of the day is to have a scratch test with your fingernail. If when you run your fingernail over the gap you cannot feel a bump, you’re set! Otherwise, you may need to reapply lightly one more layer to make sure. It will look like it’s an uneven surface due to the green hue, but it will be perfectly smooth after you sand one last time with higher grit paper like 1200.

Test passed, I’m content with the result. This piece is ready for priming!
All of the above can be used for metal and resin minis as well, however especially when sanding resin you need to protect yourself from the dust as it’s toxic to mammals. One precaution you can take is to dip your sanding or filing tool into water and sand the surface – the particles will be held by water this way but this doesn’t guarantee your protection. Best is to wear a mask, work in a nicely ventilated area and use short bursts of sanding to minimize the residue. Safety first!
This is it for this week. Hope you found the tips useful and I’ll see you on the next post. Be sure to leave me a comment if you have further questions and happy modelling!
Filed under: Tutorial Tagged: assembly, filling gaps, miniature hobby, sanding, tips, tools