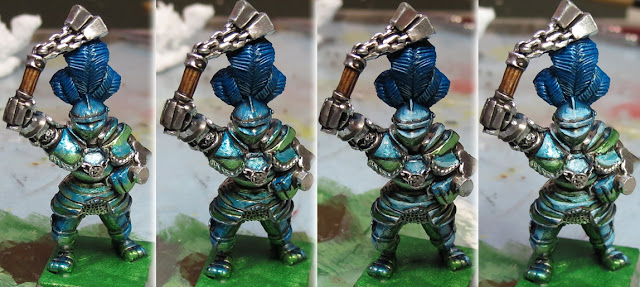
Chrome can be painted a couple ways – the first is to use actual chrome spray paint or silver as a base, then add your own touches to make it work on a miniature scale. The second is to simulate it by paying attention to the shape of what you’re painting and simulating horizon, sky and ground.
I’m going to come out and say it: I’m not supper happy with the final look of some of these chrome effects. It’s the first time I’ve tried simulating chrome but maybe it can offer some ideas for anyone trying these effects themselves.
 Spray Chrome vs Painted Silver
Companies sell chrome spray paint that will do a really good job of simulating a real chrome effect. The only problem with this is that as a spray primer, it has to be a base (Instead of white / grey / black / etc.) unless you do a whole bunch of masking.
Worth noting, looks like there are even Mirror spray paints that can paint the back side of glass.
Instead, we usually paint using silver, but there are some noticeable differences. Below, you can see a model primed with chrome:
However, if we paint half of the model with silver, we can see the difference. Below, I’ve painted half his back with silver. From some angles, it’s hard to tell. But when you turn the model to grab the light and reflection, it becomes more obvious.
The left side of the images below are Citadel silver, while the right side is the chrome primer:
Shading Chrome
I demonstrated the difference with silver and for that reason we can’t highlight chrome. We can shade it though. I’ve just used a black wash painted into the crevices and you can see how once it’s applied it looks nice and how light gets picked up as the miniature is rotated.
Throwing on a little paint makes the metallic areas pop out more. When we’re shading those, we can even bring some of the wash onto the metal to create a bit of a reflection.
Washing Chrome
To simulate the reflection that chrome creates, we apply some ground and sky shades to the armour. Below I’ve applied a brown wash to the bottom of the armour plates and a blue wash to the upper parts. Optionally, you can add a definition line between the two parts – I chose black and in retrospect think that was a mistake. Maybe I should have used a deep brown or a mix of brown and blue.
Also note that the right side of these photos look nicer than the left side. That’s the silver vs chrome difference again. Chrome primer is smoother as well.
Painting Chrome
To get bolder, we can paint the chrome on. Pictured below you can see how I painted a thin (watery) layer of green over the lower half of the armour plates. (Also, the front is all chrome, no silver.)
The neat thing here is that it actually has an almost Object Source Lighting effect which you can read more about here or here.
Below you can see how I’ve continued things:
- 1. Painted a thin (watery) layer of blue on the upper halves of armour plates.
- 2. Painted a defining line between the green and blue.
Using black looks better here, probably because the reflective effects are stronger. - 3. Lighter highlights to the blue areas.
- 4. Darker shades to the green areas.
The post Painting Chrome Metallics appeared first on House of Paincakes.


