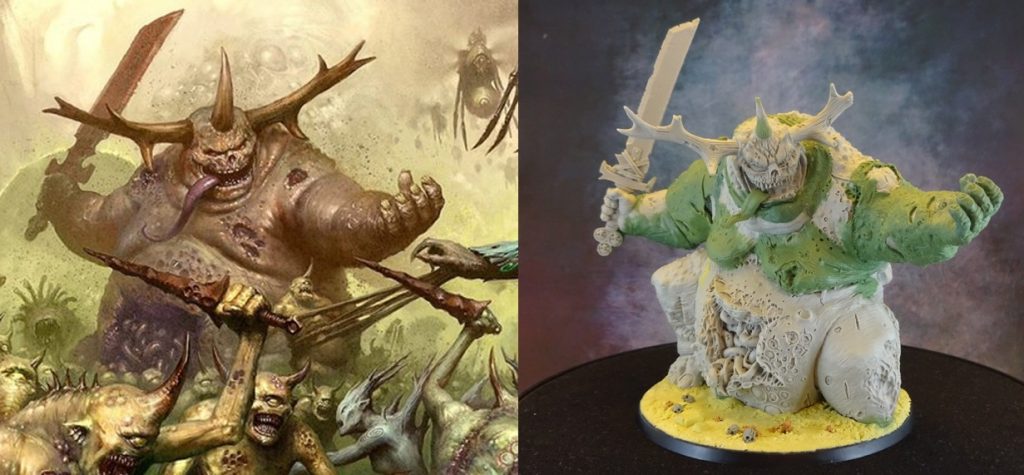

I, like many of you have always been a big fan of the Forgeworld Great Unclean One. Festooned with detail, it beautifully captures the character of Nurgle’s Greater Daemon. I’d always wanted one but without a reason to convert it I put off buying one. Then one day last year I came across a piece of artwork in an Age of Sigmar book showing servants of Nurgle in battle with the Sylvaneth. One of the key parts of this composition was a characterful looking Great Unclean One, clearly based on the FW model but with a come-at-me matrix style pose. I had to make one!
So I printed off a cropped copy of the art to serve as my design and pinned in to my project pinboard. Bought a Forgeworld Great Unclean One, which then sat his fat ass on my model shelf for 6 months. It’s a tough prospect to chop up such an expensive and beautifully sculpted model.
Before making any cuts, I made a dozen or so press moulds of the skin details using Blu-Stuff putty. Later on I would use these to effectively make skin grafts for some of the larger surface areas i needed to remake. When I finally cut him up, I did a lot of thinking about where to place the cuts. I wanted to use as much of the original arms as possible. The toughest bit was definitely the head. I couldn’t find anyway to just saw it off as it’s embedded in the model’s torso. Instead, I used a 5mm drill to drill shafts down into the body behind the head and carefully separate it from the body.

Once I had everything in bits I proceeded to pin all the parts back together with steel rod and roughly fill the substantial gaps with Milliput (just because it is much cheaper than other epoxy putties). To make his open left hand I made a press mould of his right and a greenstuff casting of it. I then separated each on the fingers of the cast and glued them back together in reverse order. I also did a separate cast of the right thumb and integrated it onto the left hand. Whilst the detail of this resulting hand was a bit of a mess the shape and mass were just right. It was just a matter of cleaning it up with greenstuff and adding in new detail.
The key part of the whole project that I would like to convey as a method for doing your own conversions like this is the grafting process. As I mentioned earlier, I had made a series of push moulds capturing skin surface details, and now I began adding a greenstuff mix (1:1 greenstuff and magic sculp) into these press moulds. Using lubricated clayshapers I spread the putty as thinly as I could (between 1 and 3mm thick as an estimate) and left it to cure. It’s worth keeping a piece of “scrap” putty from this mix to one side to help gauge when it is ready to remove from the mould. I give it roughly an hour and a half, but heat, ratios used in the putty and personal preference will alter this. It needs to be firm enough to retain surface detail but soft (and hopefully tacky) enough to apply to the surface you want to graft onto.
You don’t want to do too many grafts at once because you need time to blend the edges and add extra details, and this takes time. A lot of the skill here comes in finding the right graft piece for the right location on your model. It’s a lot like selecting the right plastic bitz for a conversion.
Blending graft edges into the model’s existing details can be difficult if the graft is too firm to work. If this is the case, leave the edges until fully cured, then trim them away and blend them with a fresh mix of putty. If you can’t get something right the first try you can always let it cure, cut it back and try again.
I modelled a new tongue for him to better match the artwork, adding texture to it by pressing a piece of packing foam onto the soft greenstuff. To finish him off I added a few Nurglings from the Plaguebearer box set.