This past spring was the 200th anniversary of the novel Frankenstein and our local library system celebrated it in a number of ways. As the Artist at Work that month and them wanting to promote their 3D printing services, I decided to paint a Frankenstein Monster bust... which was also my first time painting a bust and a neat experience.
In this article I'm going to briefly talk about the demo experience, then some 3D printing, painting the bust and finally mounting it to a plinth.
Artist at Work
 The experience itself was pretty nice. I setup a little display of miniatures with a range of styles covering both things I painted ages ago and these days. The demo took place on 2 different weekends last 2 hours each time. The first was held at their main branch with a second at another one of their branches.
I spent the time painting, yes.. but also discussing what it is we do with people who either wandered by or pulled up a chair. We talked about painting, the hobby and what the miniatures are used for, how I got started painting miniatures, how they or their kids can get started and the Maker Expo events I've taken part in. I even spoke to someone about a digital boardgame he wanted to promote and was curious about using miniatures at conventions.
It's always neat to see how people from all aspects react to our hobby.
Also got to sign their, uh, tarp.
3D Printing (and Preparing) a Bust
Always fun messing around with 3D printers.
The model itself is free from Thingiverse: https://www.thingiverse.com/thing:1836083
Which I downloaded and imported into the 3D printing software. 3D printers will often have recommended software for them. They can import most standard 3D model formats you'll get from these public sites and if not you can usually find a converter.
The software will take the model and do a couple key things - first, it lets you scale the model to whatever size works for you. It also lets you choose the "infill" setting because you don't need a solid brick of a print; usually some form of light honeycomb on the inside is fine. Finally, it tells the printer how to print it.
Another note is that printing services like Shapeways don't have infill settings. They'll print whatever you send them so you'll want to manually hollow models out to save printing costs.
You'll notice the final product isn't perfect, for a few reasons:
- Visible lines from each layer that's printed.
- This is the most obvious and the thing you're looking for when determining the quality of the final print. The higher the resolution of the printer, the less visible the lines will be. However, it'll also cause the print to take a lot longer.
New technologies, like high resolution liquid printing, does away with most visible printing defects as you can read about in a review I wrote here. - Supports
- Since it prints a layer at a time, when major parts jut out, like his chin and shoulders, supports are required to create a starting point to print from. These'll need to be cut off and cleaned like you might a mold line.
To get the 3D printed model ready, I take the following steps:
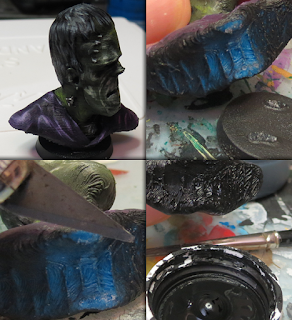
- Peel off the raft from the base of the whole bust.
- Cut off the supports.
- Clean the lines off that connected the supports to the bust.
- I also glued a 30mm base to the bottom so I could hold the bust in the GW miniature holder while painting. (Not Pictured)
Painting the Bust
I won't cover this in too much depth as that's not the main part of this tutorial. There are a few things I want to note:
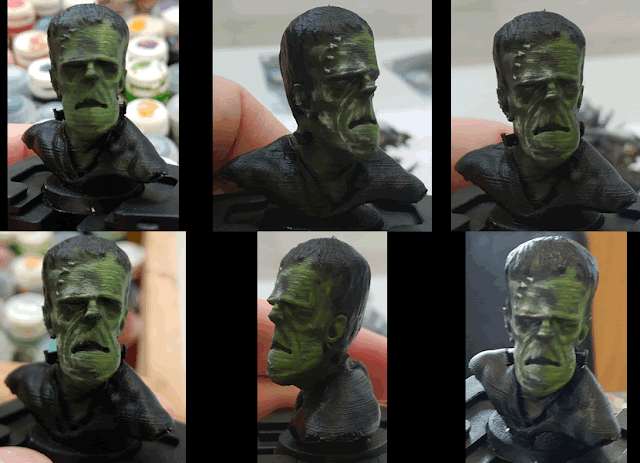
- I feel I approached this really artistically. What I like about it is painting it in two different colour palettes - first with darker greens into near-whites, followed by mid-tone greens into yellow highlights.
- When you look at the final photos, aside from the fact that right now you know this to be 3D printed, it's not completely obvious. The detail lines start to disappear as the painting on the bust is completed - not physically, but your mind stops focusing on them.
 As a final step to painting, before mounting on the plinth, I also peel off the base that was holding him, clean off the glue and finish painting the underside in black.
Green Stuff World Plinths
 I picked my plinths up from Green Stuff World, which you can take a look at here. The packaging for them is pretty good and from a quality standpoint, they're not bad. Some minor imperfections, but nothing too noticeable.
Mounting the Bust
Definitely could've done this before painting, and I think in the interest of protecting the bust, I would in the future.
Drill the Mounting Hole
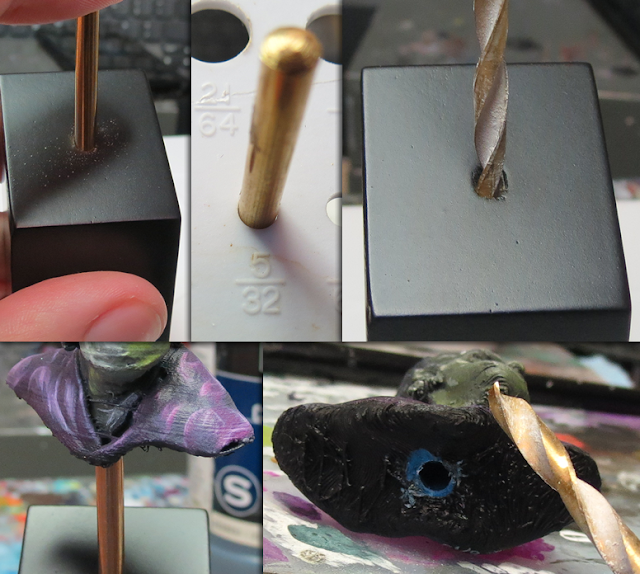
- Find the right drill bit
- You'll need to get a drill bit so the plinth's pin will fit nicely in the bust. You can either take the pin and determine it's size on a drill-sizing tool or go through your drill bits until you find one that fits in the plinth's hole.
- Drill the hole
- Start by testing the bust over your plinth to figure out positioning.
- Mark where you want to drill.
- Test the mark to double check this is where you want to drill.
- Drill the hole.
- If you're concerned about drilling too deep, approximate how deep you can drill and wrap some masking tape around the drill bit. Then, stop drilling when you reach the tape.
 Fill / Glue the Rod
So, I ended up using a filler putty to "glue" the rod in place. My reasoning for this was because the 3D printed bust has a semi-hollow lattice filler on the inside. I figured normal glue wouldn't have enough to bond to.
For a normal bust, I'd probably try super glue.
I also filed the top of the rod that'd end up inside the bust so it'd be rougher and a better surface for the filler to adhere to.
Final Photos
As I mentioned above, I'm really happy with how he turned out, the 3D printed lines are visible but not super obvious and I'm rather proud of the two-style painting that I applied to his skin and clothes.


