After the
recent Kill Team game, where I tried out some
Wyches for the first time, I decided I needed to go all the way! I figured out that I needed the expanded cards and rules for the Drukhari (um, I mean Dark Eldar) that came with the Slicing Noose boxed set. And also, more Wyches!
 |
| Rules and... stuff! |
After reading through the background material and the short story, I decided it would be fun to actually run and play this Kill Team as presented. I am sure more of my local gamer-peers would prefer just to make up their own unique team, and normally I would too, but I also thought this would be a neat challenge. Each member of the Slicing Noose is named and has a corresponding miniature to represent them in the booklet. I want to build these Wyches to match the photos as close as possible, with the exception that their garments will have red highlights instead of green/blue-ish.
 |
| The entire Slicing Noose as presented by GW. |
Matching these images up to the parts on the sprues quickly proved to be a maddening exercise in futility. So my solution was to simply assemble all of the legs at once and them match up the parts.
 |
| "She's got legs, and she knows how to use them." |
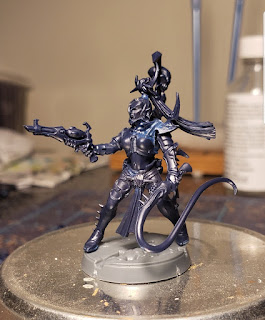
The leader, Vylekh the Untouched, was fairly straight forward model to put together, despite my 3 year old jumping around and shaking the whole room like a maniac.
 |
| GW's example. |
 |
| My Vylekh the Untouched. |
Keen eyes might spot that I am using Plastruct Bondene Styrene & ABS Plastic Solvent Cement for the construction of these Wyches. However while attempting to clean off the mold Lines in the pic above, Vylekh popped right off of her base. And that was after a night of curing! The bases I am using are a mix of Necromunda and Sector Imperialis bases. They are made from a harder plastic than the standard slots base, so maybe more cement was needed for the feet? I decided to not fool with it and just use Testors Cement for the feet/base joining.
These bases are tough stuff so I had to use my drill to make a small hole in these bases, then clip off the tabs, but leaving enough to fit into the holes.
 |
| Poser tool time! |
This worked out really well I think, although it took a bit of adjusting to get it to work right.
 |
| The completed legs. |
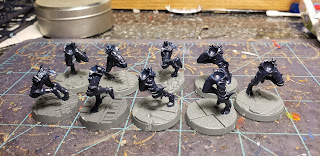
Now on to matching the torsos to the legs. This was a more challenging exercise than I guessed it would be, but fun none-the-less. It took quite a long time getting them right, but in the end I did. When it came to the blade and gun arms....well, that proved to be a royal pain in the rear. I got most of them right although there are two that I know for sure that got mixed up. Not a really big deal, but fixing them could potentially damage them so I left them alone. Matching the heads was fairly easy however, but in the end the whole construction/matching process was very time consuming, but I think I mostly succeeded.
 |
| The assembled Wyches. |
And that's it for now, hopefully it will warm up enough soon for me to prime them and get the painting process rolling.


