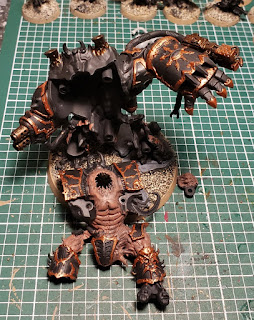
The month is rolling by fast, the season is in a colorful state of change here in the mountains of East Tennessee, and tucked away in our shotgun shack progress on this warmachine of Chaos continues. In
Part 1 of this series I focused on the modeling and preparation work prior to priming the model. Here you can see it all the parts prior to assembly post priming.
 |
| The primed parts. |
It was while scrutinizing these parts that I realized that I forgot to attach the auxiliary heavy flamer. I again decided to use a pair of standard Imperial Guard flamers like I did on the
Bloodbrute. They look right and it's easier to work them onto the model than all the other choices I have available.
 |
| The heavy flamer assembly on the Bloodbrute. |
I seem to have a lot of these arms in my bitz bin also, so it's an easy thing to make happen.
 |
| Cadian flamers. |
I thought about getting a bit more advanced with this assembly and model on some fuel hoses. But I quickly determined that this would be more ambitious of a project than I have time, or patience, for. But I came up with another idea that involved a fuel tank but I nixed that one also because it was just too absurd. But it did inspire another idea...
 |
| Flamers attached. |
Looking at this model it's clear that there is a techno-organic fusion occurring throughout it. Muscles are evolving throughout the piece replacing machine parts with some of that muscle mass still containing pipes, pistons, wires and cables running throughout it. I thought a pair of tanks attached to the rear left side of this thing looked interesting. I imagine that they connect to hoses that run throughout the body and come out through the arm to terminate at the heavy flamer. It's sick, insane, and woefully appropriate for this thing.
 |
| Fuels tanks attached. |
Next up, I turned my attention back to the overall paint job. I started with the fleshy bits, particularly the head, legs and abdominal areas.
 |
| The fleshy bits. |
Then I basecoated the trim using Gamecolor Hammered Copper. I used Tin Bitz on the Multi-melta barrel and the flamer.
 |
| Hammered Copper trim. |
And progress shall continue, but this is where it's at right now. I should have more done in about a week. Meanwhile, see what everyone else is up to over on the main
Dreadtober site.


