 “Real” is a term I’ve dubbed in regards to painting Metallic Metals using paint that actually contains metal.
The Supplies
As an example, here is what I’m working with for the basic tutorial I’m writing up:
– Metal Effects – Iron Paint
– Sophisticated Finishes – Rust Antiquing Solution
Being that you’re working with chemicals, it’s best to be aware of their dangers. These solutions are generally really bad if drunk (seek medical attention) and more of an irritant otherwise. It varies though, so you should always download the MSDS for any chemicals you’re working with. Googling anything like “rust activator MSDS” should bring up something to go on and companies are required to make these documents available.I’ve also found varnish to react to these chemicals, clouding and looking poor. Careful and test application.
Application
Normally, you’d use the paint and chemical in a 2-step process:
1. Apply the paint.
2. Apply the chemical after the paint has dried.
This creates a great rough aged iron appearance like you’re used to in traditional rust. (This is how I painted the King’s collar.)
I found you can also mix the chemical and paint together to get a smoother, blended, rusty appearance.
 |
| Left: Applying chemical over dried paint, Right: Mixing chemical and paint together. |
Painting the Elemental King’s Shackles
Non-Metallic Metal Undercoat
– I painted the collar a blue-grey NMM first, because rust doesn’t always completely eat away metal. It’s often patchy and random.
– The NMM “iron” creates a base that when the collar is finished, doesn’t react with the chemicals and instead shows through beneath all the rust.
– This is actually what I refer to as Mixed-Metallic Metals (MMM) but I’ll cover that in more detail later.
Painting Iron
– In this context, the progression shows that the iron paint is a dull, flat, grey with a rough texture.
– To build up the base for the rust layers, I also dab and glob some more iron here and there.
Adding Chemical
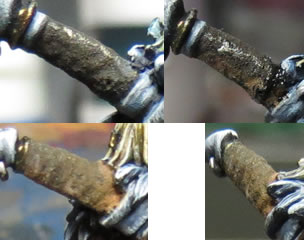
– Painting a layer of the blue chemical and allowing it to sit overnight creates a rough yellowish light rust.
– By allowing the chemical to age the paint, then adding more and more layers of the chemical, it intensifies the rust, giving you control over how rusted it is.
Smaller Scale
It doesn’t look as great over a smaller scale and honestly could fairly easily be replicated with some orange paint.
Here’s an example of using these effect on the hilt of a sword. It works, but it’s a lot of effort for such small results.
Beware Metallic Stains
Because this is chemical, it acts much like real rust does – as chemicals, rain and the elements wear away metal, rust can flow like a rough wash.
Other Metallic Paints
Iron and Copper are great metallic paints because they react so well with the antiquing solution. (You can see an example below of Copper that’s had the patina green added.)
Pewter and gold are some other options, which while they have a realistic look, don’t really antique. I’m a little disappointed by them, because they’re not too far off from normal True-Metallic Metals.
In my opinion, stick with iron, copper and brass as those are the paints where you get a benefit from antiquing.
 |
| Copper antiqued with patina green. You can go easier to not turn everything. |
The post Painting Real-Metallic Metals (RMM) appeared first on House of Paincakes.


