 |
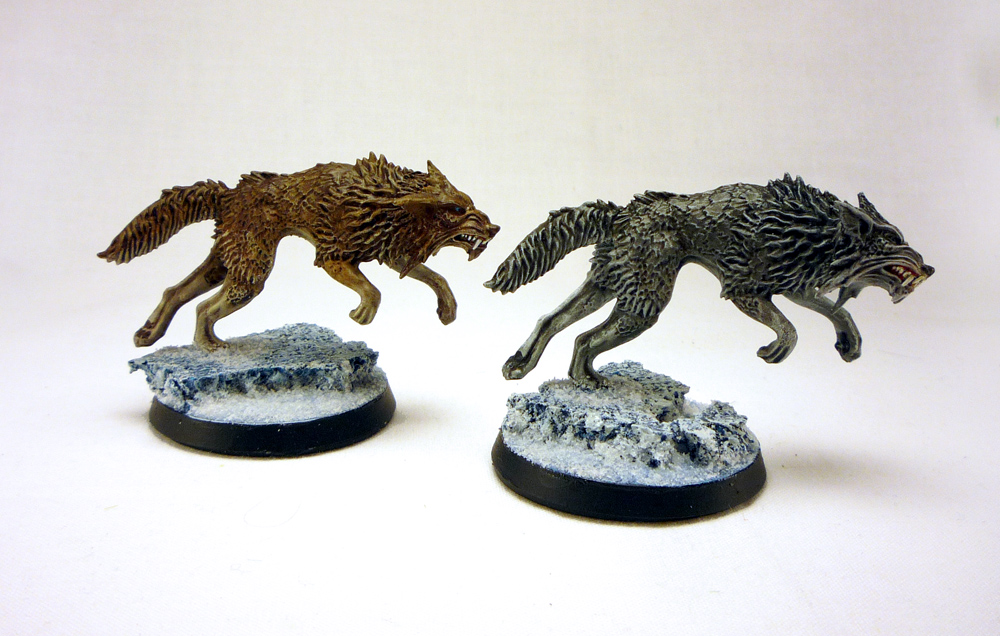
| Here's how they look "in action". |
What You'll Need:
Your bases
Cork sheet
Realistic Water (from Secret Weapon Miniatures or Woodland Scenics)
Gale Force Nine snow flock (or the Woodland Scenics equivalent)
Paints:
Hoeth Blue
Drakenhof Nightshade
Lothern Blue
Ulthuan Grey
Gloss paint of your choice (I used GW's)
Abaddon Black
Your preferred sealant, I use Testors Dullcote.
Your 100% finished models (sealed and all)
Step 1: Getting Prepped
Rip on up on that cork, yo.
I started very basic, just ripping off a round-ish piece that was just smaller than my base. It's handy to have a base of each size nearby for comparison. Then you can get fancy with multiple pieces on a single base or layer the cork for a little height. Go crazy, just keep in mind that you're going to be putting something on top of it eventually.

Then glue your pieces down, I used super glue since it was handy. Let that dry for a bit. Now, if your model is like the Fenrisian wolves, it has a little bit of a base attached to the foot for a stronger contact point. I used my hobby knife to carefully cut some grooves into the cork to set the model down in the base a little to conceal the connection. You won't need to do that all/most models.
Step 2: Paint That Thing
At this point you can prime them if you want, but I skipped that step and just painted straight on the base and cork. Start by getting a nice base coat of the Hoeth Blue. Use a stiff brush to help you get in all the nooks and crannies of the cork.

Give it a good wash with the Drakenhof Nightshade. Let it dry for a good long while.

Next, give it a good drybrushing with Lothern Blue. You don't want to get in the deep crevasses or anything.

Then give it a nice drybrushed highlight with the Ulthuan Grey.

You can be sloppy with the base itself, as that will soon be covered with snow. You just want a nice icey color to go under the snow, as it will affect how that looks.
Step 3: Seal 'Er Up
Now, I decided to stop at this point and go seal the whole thing. The cork itself can be brittle and break off, so I wanted to give it some extra strength before I moved onto the next step. I plan on playing with these models, so they will be handled more roughly. I gave it a good spray of Testors before I moved on.
Step 4: Oooh, Shinies!
Take your glossy paint of choice, and give a good coat of it over the cork. You don't need to put it on the base itself, but if some gets on it, no big deal. Let that dry for a bit.
Now here's where you have some options: slushy snow or "blizzard" snow. I went with slushy, since they're ice bases.
For slushy snow, take a brush, load it up with some Realistic Water, and put a thin layer all along the plastic base, not on the cork. Then throw some of the Snow Fluff on top of it. A whole bunch. I used a plastic spoon to shake the snow on top. Count to about 15. Seriously, do it, or it will look too slushy. Then shake the excess off and this step is done. This method is slightly more "delicate" than the other.
 |
| This is the slushier look. |
There are several mixing options that I played with, here are the results:
 |
| Arrow is pointing to how this method looks. |
Once they're dry, take your nice black paint and touch up the edge of the base.A- GFN snow mixed with PVA glue
B- GFN snow mixed with Realistic Water
C- Secret Weapon Mini's crushed glass mixed with PVA
D- Secret Weapon Mini's crushed glass mixed with Realistic Water
I opted to use the GFN snow instead of the crushed glass for two reasons. First, with the method I used where you lay down the adhesive and drop the snow on, the glass looks like pure slush and doesn't have that look of a light dusting of snow that the GFN stuff does. Second is, the crushed glass is crushed glass and I want that to be pretty secure on the base and not falling off everywhere.
And a sort of third is that in a past life I used to cut glass, probably the very same kind of glass they use for the snow, and it's not the best thing in the world to breathe in. As I already have a higher-than-average exposure, I decided to wear a mask while working with it (as is recommended on the label, I might add). I decided that for the slush I wanted, it was too much of a hassle for a slightly less appealing result.
That being said, if you want snow snow, I definitely recommend mixing the Secret Weapon snow with Realistic Water. It is the best of all the approaches I tried. You really can't beat the realistic snowy sparkle you get with the glass. Mixing it with the Realistic Water also holds it securely to the base, so you won't be leaving a trail of glass bits wherever you go. Just don't add too much of the Realistic Water or you'll end up with a hard slush base.
Step 5: Finishing Touches
Once you've selected your slush method and it has dried, you can glue your model in place. Repeat your prefered snow-making method around the points where the model connects to the base, and a little bit around the surrounding area to help him blend in. I didn't cover the whole cork part, because I wanted it to look more icey than snowy, but whatever floats your boat.
Let them dry, and then smile because you have some nice looking bases there, my friend.

Now, if ice isn't your thing, what's cool about the cork is that just by slapping it on the base with some careful color choices, you can turn it into rocks, a desert, a jungle who knows! And with the texture paints GW sells now, you can really get some mileage with the cork. I'm really in love with it, in case that wasn't already obvious.
I have about another hundred or so of these bases to make, so I'd better get cracking. For Russ!