So what about that monument temple made from foamcore I talked about last week? Let’s find out!
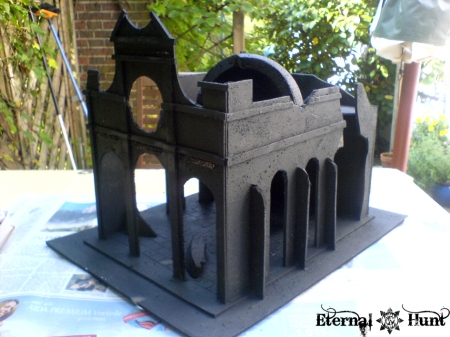
Here’s where we left off last time: The basic assembly is complete and the building has been undercoated in black:

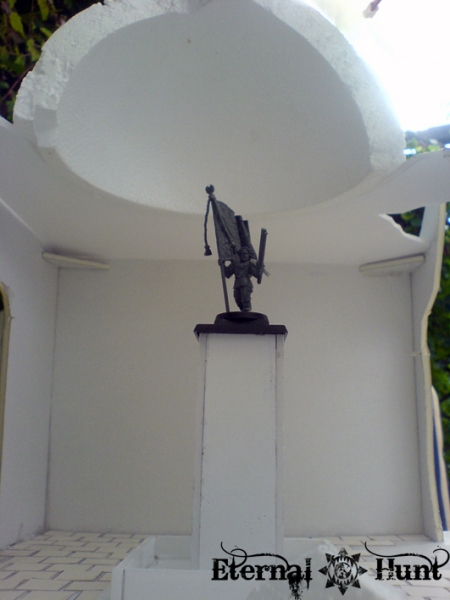
While everything was drying, I decided to work a bit on the actual monument that was to go inside the temple. For ease of assembly and added flexibility, I wanted the monument to be removable. Here’s the early construction I did for the monument:

As you can see, it consists of a column that sits in a small basin (later to be filled with water). The basic construction was, once again, done using foamcore. A cardboard loo roll would have worked as well to make up a column, but I wanted a different look this time, so I went for a rectangular faomcore construction instead. Two square WFB base was used for the abacus atop the column. That way, I could be sure it would be easy enough to attach the actual statue to the column later.
The statue itself consists of bitz from the Cadian Command Squad. I decided that I wanted the monument to have been erected in honour of the brave Imperial Guard, so I built a guard standard bearer in parade uniform for the monument — a very straigthforward affair. The model was kept separate from the rest of the monument for now.
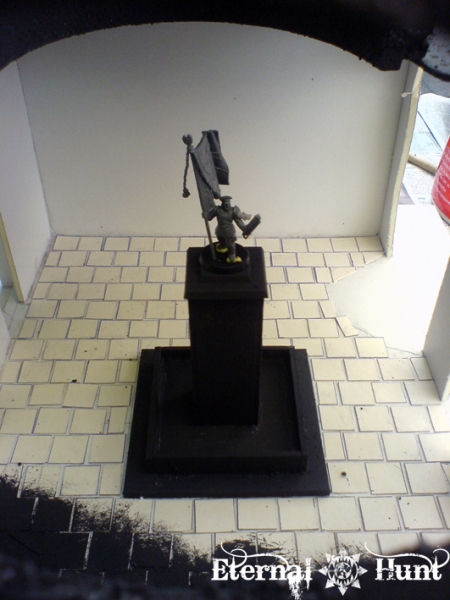
Afterwards, the column and basin were undercoated, using the same texture paint I had used for the rest of the building. Here’s the monument after undercoating:

I then used cheap grey spraypaint (picked up at the DIY superstore) to make the monument look like it was actually made of stone. Take care not to apply too much colour during this step, because some of the darker undercoat showing through in places will actually make the piece look more believable.
Then I thought about how to best represent muddy water in the shallow basin at the bottom of the column. Since this was only a one-off project, I didn’t want to spend money on a huge bottle of water effect, so I had to develop a plan B. In the end, feeling slightly adventurous, I mixed PVA glue with a bit of water that I had in turn couloured using a mix of brown and green hues (mainly GW Gretchin Green, GW Scorched Brown, and some GW Rakarth Flesh). The resulting mix was then poured into the basin — if you’re trying something similar, make sure the basin’s actually waterproof and the stuff doesn’t come out at the seams! The mix also has to be thick enough, so use quite a lot of glue! The water’s mainly there to add the colour and to make everything slightly more fluid.
Here’s the monument after that step: As you can see, the water ended up suitably brackish and dirty — just as planned. I also added some plastic plants that I spraypainted brown to make them look dried and withered.

The monument was then set aside to allow for the “water” to dry. This took about 24 hours for this relatively shallow basin, so resist poking it to see whether is has managed to set yet! I actually couldn’t wait and made a (very small) indetation into the surface that way. Trust me: You need to be patient for this!
In the end, the “water” ended up looking nicely brackish and with a glossy surface, making it look reasonably realistic. I would have loved the mix to retain some of the glue’s usual transparence, but alas, it was not to be. Still, definitely better than getting some expensive water effect for a simple one shot!
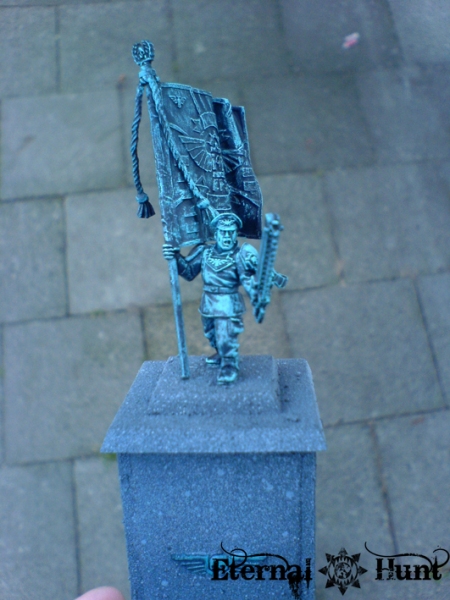
I then painted the actual statue, which was really very easy: The model was undercoated with GW Chaos Black spray, then basecoated with a 60/40 mix of GW Chaos Black and Vallejo Halcon Turquoise. Then I drybrushed the model with a 50/50 mix of GW Skull White and Halcon Turquoise. The raised detail on the regimental flag lent itself especially well to this technique.
Here’s the result:


As you can see, the statue’s surface looks like heavily oxidised metal, just like you might see on a real-life statues you might see in your vincinity. All in all, I was very pleased with the effect. The statue was glued to the column using superglue. And with that, the monument was finished.
Here it is, placed in its eventual spot in the yet unfinished building:

While I had worked on the statue, the rest of the building had had ample time to dry. So the next step was to add slightly thinned down PVA glue to the nooks and crannies of the building. Then a mix of sand and smaller stones was added on top to represent rubble:

You can really add lots and lots of the stuff for added realism, plus segments of fallen walls and ceilings. Personally, I tend to go for a less realistic result simply because it’s pretty hard to add multiple layers of rubble and make sure they stay in place. And too much rubble and uneven surface texture can also mean it will be hard to actually place your models in the building during games.
Anyway, a second coat of thinned-down glue was added on top to seal the rubble. Then the rubble areas were sprayed once again with black.
After everything was dry, the building was sprayed with the same grey paint I had used on the monument. Again, go for a slightly uneven approach to create plausible shades and a more realistic looking surface.
Almost done now:

I also painted the inscription, using one of my regular GW brushes. The letters were undercoated in chaos black, then painted with Vallejo Tinny Tin, then washed with GW Agrax Earthshade. Then I added some light accents, using GW Dwarf Bronze. And finally, I added a thinned-down mix of Vallejo Halcon Turquoise and GW Skull White on top to represent verdigris:

And with that, the building was basically finished. Here’s a view from the side:

I used the grey spraypaint to add some additional accents where necessary. This only took a couple of minutes, though. Here’s the finished monument temple:


And some additional detail shots of the statue:


Looking back now, there’s quite a bit that could still be added: It might look cool to drybrush the tiled floor with white to pick out the contours. Posters and propaganda proclamations could be added to the building, as well as blood splatters, additional damage etc. I am still free to do all of this, however, as the finished build should be easy enough to modify.
Anyway, as you can see, building and painting this monument temple was almost as easy as constructing one of the easier ruined buildings. The scope of the project may be different, sure, but in the end, the techniques are the same. If anything, a larger buildings will give you far more options for adding details and little setpieces- Just make sure you don’t add so much stuff that the terrain piece no longer works during games ![]()
To wind up this post, here are some impressions of Inquisitor Antrecht’s warband moving through the ruin, to give you an idea of the scale:


In any case, I hope I was succesful in showing you how easy it can be to come up with a centre piece for your gaming table. All C&C are welcome, of course: Just let me know what you think in the comments section!
And, as always, thanks for looking and stay tuned for more!
Filed under: 40k, DIY, Terrain Tagged: 40k, building, DIY, foamcore, Imperial monument, painting, quick and easy, terrain, tutorial, wargaming on a budget
