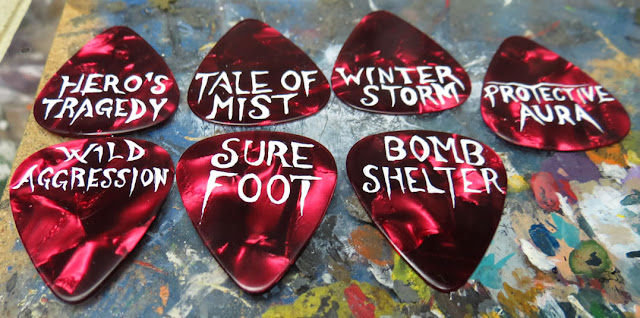
 So I was waiting while having some stuff rung up for work the other day and had a flash of genius - using guitar picks to make custom tokens / counters for your army. Yup, I know, another awesome idea courtesy of Wargaming Tradecraft. You could probably also use this technique for other board and roleplaying games.
Speaking of awesome ideas, I posted a teaser pic to the Wargaming Tradecraft Facebook Page and got some fantastic suggestions on other uses for guitar picks like this. Draconic decorations like scales, armour, shields, molten lava, jewels and stones. I bet you could think of more, but in the mean time, I'm going to use them to make tokens!
A bunch of the steps I'm about to show you are optional and depend on how much effort you want to go through. Technically, you could just buy a bunch of picks, write on them and be done.. but as usual, I'm going to show you how to make them look really nice.

They weren't too expensive, $5 for 12 and I bet I could find them cheaper or get them online in bulk. (A quick eBay search shows this is the case.) Most cities will have a few music supply stores with a selection of picks so you shouldn't have a problem tracking these down.
So, as I mentioned, they take a little work to make look really nice. Guitar picks are designed to be disposable and get scratched up, so they're not going to look fantastic on close inspection. In fact, if you look below, you'll see the original pick (straight from the bag) looks a little faded and scratched. That's why I'm going to sand and buff them too.
These picks are stamped with the "Fender" brand, which doesn't come off too well. This means only one side is really usable. Oh well.
Sanding
Sanding's the easy one. It cleans off the dull finish, sharpens colours and removes scratches. Try sanding in small circles to avoid adding any scratches of your own. You can use pressure at this stage, but not too much.
You'll want to use REALLY fine sandpaper, again to avoid adding scratches. TheWife uses "2000 grit, wet sandpaper" for polishing jewelry. (Higher the grit, finer the sanding) As an example of how smooth that is, your average sandpaper is below 200 grit. You can find this with automotive supplies. When sanding with wet sandpaper, be sure to keep everything soaked.
Buffing
You could stop with sandpaper because it does a great job. To take it another step, use a buffing wheel on a rotary tool. (You could even try using polishing compound, though I didn't.) This will add a gloss, smooth, high quality finish.
Don't push too hard! In the photo there, you'll see that when I did, it heated up the pick enough to melt some spots. Once again, make small circles while buffing to avoid scratching.
Labelling
Now, label your picks with whatever you want them to say. Keep in mind you've just smoothed out the picks and they're not primed - paint won't apply too nicely and will scratch off easily. I used white gesso (paintable primer) so it would stick better. (Haven't tried it myself, but there is clear gesso.) If you make any mistakes while lettering, use something smooth / dull to scratch the paint off and try again.
Lettering can be a little tricky, especially if you care about text being centered. If it helps, get out a ruler and figure your letter spacing first. You can place dots on the pick where you want the letters to go and scratch the dots off with your fingernail after. As for the font, I made very little attempt to make the letters look the same and just had fun. Don't let the little things bug you... BUT if you really care, print your labels off a computer and cut the letters out to make stencils.
You'll notice I've labelled them in different orientations. For my uses, when the tip points down, it shows the (de)buff is affecting a specific model and when it points up, it affects a group of models.
Varnishing
As mentioned, paint doesn't stick to shiny surfaces well, so you'll want to varnish the pick. I'd recommend using gloss. It'll add a sheen, sharpen colours and helps hide (fill) smaller scratches.
Worth noting - use some sticky tac or something to raise the pick up for varnishing and gelling. Otherwise, it could seep under and gum things up. If you DO happen to make a mistake like this, it's ok... you can scrape it clean, sand and buff it.
Gel Covering
Another option is to give the tokens a nice clear, rounded finish instead of just varnishing. I've spread some pouring medium, out over the top using a toothpick. Like my terrain project, it'll take a bit to fully dry.
You don't want to varnish before gelling, but DO remember to varnish after. You'll handle these a lot and gels can warp with imprints like finger prints. Varnish will prevent that.


