Before I start the tutorial I just would like to say a few words why I am doing it. I received a few requests about how I did a few things and since all I know has come from the help and experience of others more talented than myself I feel an obligation, a debt if you like, to help others when they ask me. Just to be clear I am not trying to show off or be condescending, if fact if you read the blog I don't go into the detail shown in this article. I believe that the more you help others improve in their hobby, the investment comes back around with other modelers inspiring me with their works and making me want to improve more. That's all.
So in this tutorial I will be detailing how I did the Mark of the Wulfen (MOTW) and the Wolf Tooth necklaces (WTN) in a bit more detail than what's in the blog entry. Ideally I would of liked to do some short videos on how to do certain things since it is easier to see it done than explain it, but I am not equipped at the moment for such things, so I will do my best to explain it with word and photos.
Step One – The Materials
The materials I used to make the MOTW and WTN are duro epoxy-putty (greenstuff), talcum power, and two sculpting tools – one with a point and another with a flat tapering point. You will also need a sharp modeling knife or blade, pliers and cutters, super glue and plastic cement, and a hobby drill.

Step Two – Posing the Model
The posing of the MOTW is very simple. It is a just a matter of cutting the model in the right places and repositioning them in a natural position. By the way, don't forget to shave off all the Choas iconography with a sharp knife and pin file.
The best way to cut Space Marines is from the interconnecting parts of their armour. Make the cut and scrap off all of the interconnecting section.

Next, take the hobby drill, and drill holes in both sections and insert a thin bendable metal rod, like a paper clip. Make sure the drilled holes are centralized to insure a good fit and cut the rod to guarantee the right proportion for the leg.
Now just bend and position the part until it is what you are looking for and and has a natural position, then glue it into place.

Now mix up some green stuff and build up the interconnecting selection of the armour. This is quite easy. First place the putty and smooth it out into the required shape. Remember it should not be level with the armour but a bit lower. Then take the flat tapering pointed sculpting tool and with the edge slowly and carefully insert groves. Don't worry if you make any mistakes, just smooth everything over again and redo it. The picture below shows a very quick example I wiped up for the tutorial. Unlike the pic try to make the groves closer together.

Step Three - The Arms
The arms come from the Chaos marauder cavalry box set. It would be a simple matter to just glue the arms on and cover the joint with the main shoulder-pad, but with a bit of extra work you can get far better results.
Space Marines have a smaller minor shoulder-pad (in lieu of a better description) under the main one. The pic below shows this better. For better fits it would be wise to build this up with putty.

There is not need to make it perfect, just a good fit. Add epoxy-putty and form a rough shape similar to the minor shoulder-pad. Then take a main shoulder pad with some talcum powder on it and press it on to the putty to imprint the shape. The talcum powder serves as a non-stick layer. Gently take off the main shoulder-pad and leave the putty on the arm dry.

When it is dry just use your hobby knife and trim off the excess and give it a fine sanding to smooth it out.
N.B. : Before doing the above first make sure of the positioning you want to achieve. You might find that you have to attach the arm with a metal rod first and add the putty after to achieve a natural position. The possibilities are many and it is impossible to cover them all, but with these basics you should be fine.
Step Four – The Wolf Tooth Necklace
This is the most time consuming section of the modeling process. It does not require any particular talent to do (if it did I would not be able to do it!), just some patience and determination.
First of all, a word on green stuff. I use a 3 part yellow to 1 part blue mixture nearly exclusively with all my modeling. This is something I learned from the great Bill Horan at the UK expo. The putty still cures hard at this ratio and gives you a better flexible sculpting medium to work with.
First you need to drill small holes in the shoulder-pads. This is done with the hobby drill naturally. In the photo below I used a thicker bit than I should of. This is because my last fine bit snapped and I did not feel like crossing the island to buy one. I will fill in the excess later with putty.

As you can seen I paint up the shoulder-pad before hand. This is done on purpose. Unlike other epoxy putties, green stuff does not release residue when you add water or when brushed, unlike Miliput, Andrea Sculpt, or Magic Sculpt etc. It would be more difficult and painstaking to paint on the markings and add decals after adding the WTN. This is an advantage green stuff gives you.
Next, mix up some green stuff and roll it out on a smooth surface as thinly as possible with your finger. Be gentle and don't press too hard or else you will flatten it. Don't roll out long sections either, keep them short; it is more manageable. For better results spread some talcum powder on the surface and on your fingers, don't use too much though since talcum reduces the stickiness of the putty. If you prefer you can also use water which does not reduce the stickiness but does reduce visibility due to refraction.

Now just cut the string of putty to an acceptable length and attach it to the shoulder pad. Fit the ends into the holes drilled with your needle tool. Now at this stage, while the putty is soft, you have to set the string of putty in a way that gives the impression of looking taut but with a naturally looking curve due to the weight of the teeth and other stuff attached to it. This is done simply by gentle pushing the putty string with a sculpting tool. Now put the model in a safe place and let it cure properly for a few hours. You can decrease curing time with gentle heating ( even down to 10 minutes if necessary) but be careful you don't warp the plastic model.

Now the hard part. The teeth. First, a tip. Freshly mixed putty works better for attaching the teeth, so mix minute quantities (unless you don't mind wasting or are working on something else simultaneously) and don't use putty that has cured too long or you will risk your sanity.
After mixing the putty, roll it out and cut it into small parts. Do not use talcum powder; you need the putty to be sticky. Just dampen your knife and fingers when working.

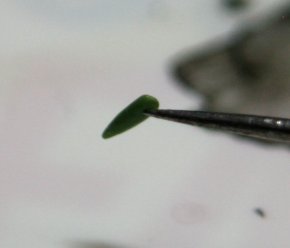
Now gently taper a side of the small parts into a point with your finger. Be gentle and consistent in the pressure you apply. The pic below shows the results of this with different sizes of teeth.

Now with a dampened needle tool touch the root of the tooth and pick it up. You might need to apply a bit of pressure, but if the putty is fresh and sticky this should not be a problem. Take the tooth to the putty string on the shoulder-pad and with the patience of the gods position it according to the curve of the shoulder-pad. Also try to curve the teeth a bit at the point, it looks more natural, don't leave them straight. Always start positioning teeth from one of the ends of the putty string. Don't start from the middle. When the tooth is attached take the needle tool, dampen it, and use it to press in a hole at the top near the string.
This process can be tricky, but there is really no other way for me to explain it. To make it easier, if you are working on several models, then just stick two teeth on each, indent at the top, and let dry and then stick some more and let dry again. This way you won't risk squashing the teeth you already have placed. It also gives you more space to maneuver. Also, if you don't manage to attach the tooth within two or three attempts, put everything down for a minute, take a deep breath and try again. Trust me on this, don't struggle with the putty.
If you would like to add runes, then this is even easier. Just add a small blob of putty under the string and with the sculpting tool flatten it out, shape it and use the point to mark runes in it. Always dampen the tool or cover it with a thin layer of talcum powder. I prefer talcum when doing this. Now add a hole on top near the string and put it aside to cure.

When all the teeth and runes are attached and cured, it should look something like the photo below. Now at this stage I like to give the work a quick coating of matte varnish to help seal everything and leave it another hour to dry. The next step is to attach the teeth and runes to the putty string.

This is simple and easy. Roll out a very thin piece of putty and cut off a small part (note that it must be long enough to reach over the putty string on the shoulder-pad). Pick it up with the needle tool in the same fashion for the teeth, and gently but firmly place one end in the hole at the top of the tooth. Tuck it in with the point of the needle tool and bend it over the string. Now tuck the other end into the string and delicately remove the excess. Slowly yet surely repeat the process and Viola! Your tooth necklace is finished. Now you just have to paint it in.

These figures are just for gaming so I don't bother with extra work of fine tuning them. I leave that for dioramas and other 'showcase' pieces. But if you are a gamer who wants more than just a presentable army; if you want your army to be a collective showcase piece like many gamers on this forum then take more time on them and you will be able to achieve stunning results, especially if you have some talent, which sadly I do not possess.
Well that's all for now. I hope I have covered all the difficulties that might arise, and I hope you all find it useful in some way or another. If there are points that you did not understand or that you would have explained better (maybe with some more pics) or have another related question please leave your question in the comments section and I will be more than happy to answer it or clarify or even add to this entry. No problem whatsoever, so don't be shy.
Farewell and good health,
