This will be the result. (hopefully)
Disclaimer from The Wife: This is not a grabbing-resistant mobile. Do not place this directly over an infants' crib, as the small pieces will detach if pulled. And I'll be honest... It's pretty easy. It took me 1.5 hours total from beginning to end.
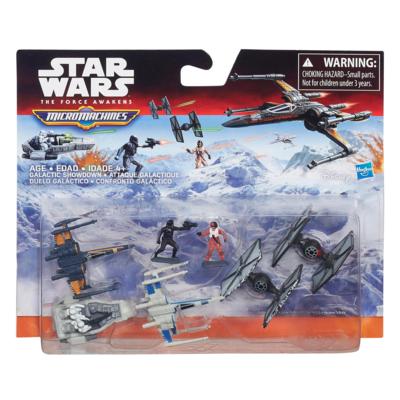
To start with we'll have a picture of the materials
I bought two small kits pictured above for the Star Wars figures.
($11.99 at Hobby Lobby with the Force Awakens Re-release)
($9.99 from Target, Toys R'Us, etc.)
The necessary bits above are:
1. Heavy duty thread (color is your choice)
2. Large sewing needle (a larger "eye" is easier to thread)
3. Toys pictured above
4. Pin Drill
5. "I" beam styrene (Available at any model railroad hobby store)
6. Hobby chain for hanging mobile
(Optional)
Beads for adding beneath micro machines for added bling
(this was the most time consuming part for me... threading beads.)
Alright, so first things first... I made an Episode VII mobile but there are quite the options for the model above:
http://www.revell.com/model-kits/entertainment/starwars.html
and the micro machines hanging beneath:
http://www.hasbro.com/en-us/toys-games/?limit=48&q=star+wars+micro+machines
Whatever your favorite movies are (Ep. 1-3, 4-6 or 7,) there are models to fit it.
1. First remove the bottom plate of the Millenium Falcon from the packaging.
Using your pin drill, make a hole through the bottom of the Falcon plate. (I found drilling into the assembly pipes an easy way to make sure the mobile is balanced.)
2. After that, thread the needle with the string, and pull the needle through the hole. Once the thread is through, knot the thread ABOVE the bottom base plate. (If you pass the thread through the loop multiple times, you can make a larger knot to hold the thread.) Cut off the String ABOVE the knot, but leave a length (8 inches or about 125mm,) BELOW the Falcon plate.
3. Next, cut a length of Styrene I beam (4 inches or 60mm) and drill a hole through the center. Thread the needle through this hole (still attached to the thread knotted above the falcon plate.) knot the thread BELOW the I beam, and cut the excess thread below the knot.
4. After that, drill a hole on through one side of the I-beam (1/4 inch or 5mm from the edge and in the center of the beam itself,) Thread the needle and attached thread through from the top and knot the thread ABOVE the I-beam.
5. The next step is to drill a hole through the micro machine. I chose the tie fighter first, and drilled through the center of the recess for the flight stand in the bottom of the figure. Thread the needle and thread from the top of the figure to the bottom. (At this point you may optionally thread beads on to the thread BELOW the figure for added bling and to adjust differences in weight between the micro machines. The Tie fighters are heavier than the X-Wings, so more beads underneath the X-Wings make them balance out.) Knot the thread BELOW the figure and cut off the excess.
6. Repeat Steps 4 and 5 on the opposite side of the I beam for the X-Wing to finish the dueling X-Wing and Tie Fighter.
7. Repeat steps 1 through 6 on the opposite side of the Falcon plate for the second duel.
8. Finish assembling the Millenium Falcon as directed (use super glue for peace of mind), but leave out the central clear window on the top part of the Falcon. (This gap will be used to hang the mobile.)
9. Using a length of chain, twist the bottom ring open, slip it through the hole in the Top Falcon plate, and twist the bottom ring closed.
Your mobile should look like this (hopefully) and you should have earned some Man points ;) Let me know how it goes!

