It has been a couple of months since the Forgebane boxed set provided us not only with a very cool – and entirely Space Marine-free – 40k starter set, but also with the Armiger Warglaive, a very interesting smaller pattern of Imperial Knight:

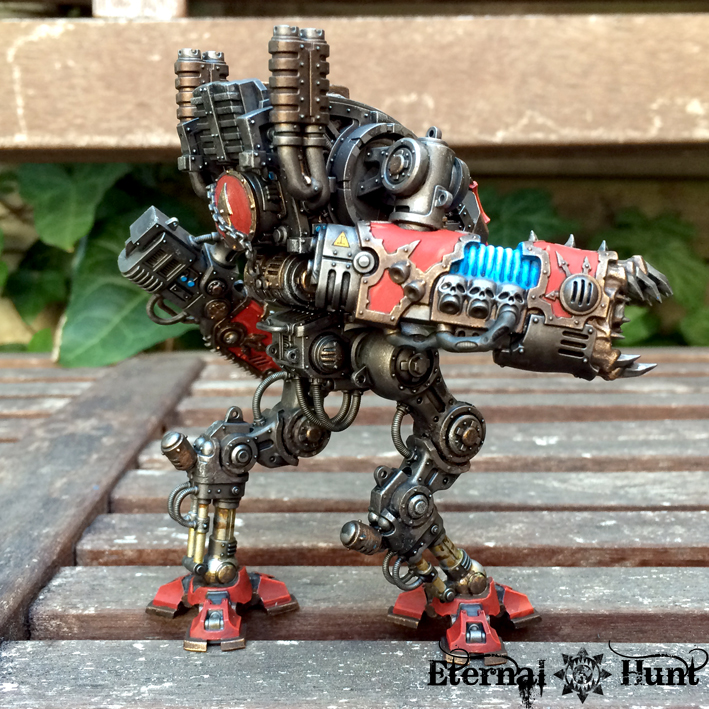
In the interim, we have seen a full release of the Imperial Knights as a faction, with new smaller and bigger Knight models to boot. And some of you may still remember my conversion of a Renegade Armiger from a while back:
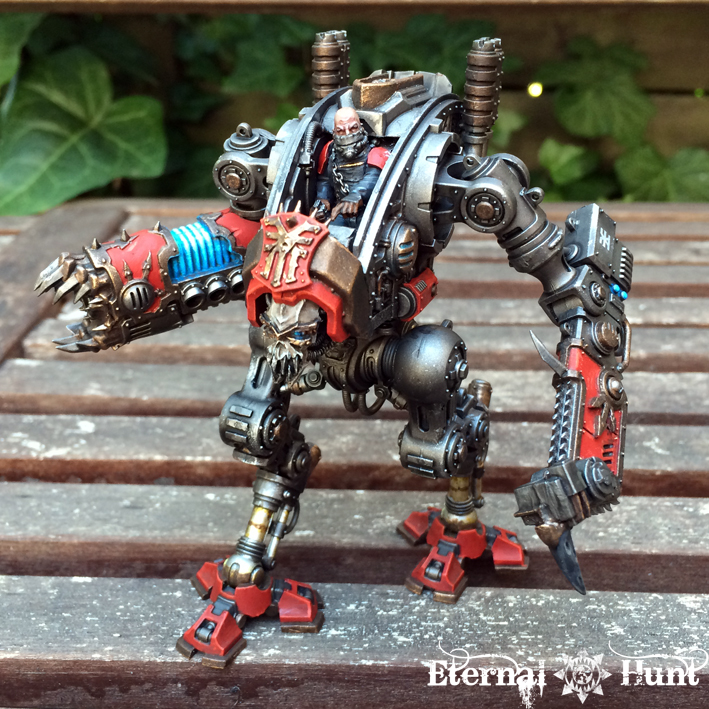
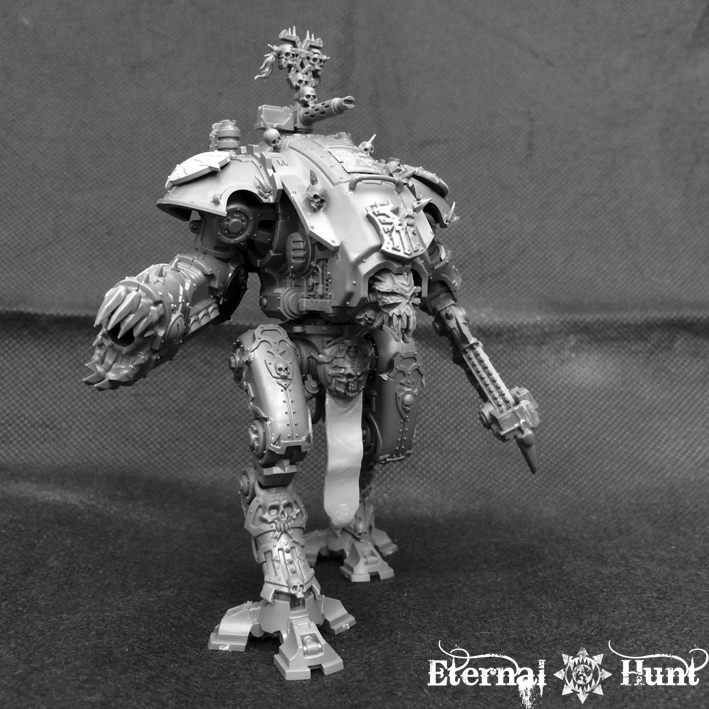
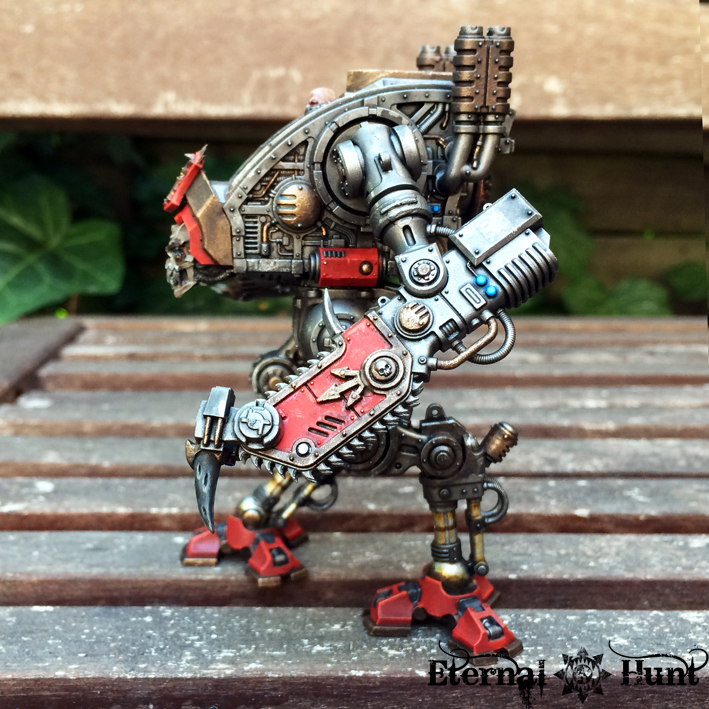
Of course I just had to build some chaotic Armigers to accompany my Chaos Knight Titan, Gilgamesh – the Warrior King – and the guy you see above was my first proof of concept — and one that I am still very happy with, it must be said!
However, with my recent focus on painting INQ28 characters, the poor Armiger has remained unpainted all through the recent Imperial Knights release — high time, then, to return to the model and finally give it some much needed attention!
I. “Fire the Ursus Claws!”
First up, something I have wanted to share with you for quite a while now, but the chance never presented itself:
After building my first Armiger, I realised that I wanted to get a bit more creative with the CC weapon on the second model — and there was also something about the way Armigers are portrayed in the fluff as support to bigger Knights in the fluff, helping their masters to bring down their prey and soften up bigger opponents, that drew me back to the World Eaters’ background and the armament of their warmachines in the lore — and then fellow hobbyist Augustus b’Raass put words to the vague idea I had been thinking about all along:
OOOH OOOOH this gave me an idea: how about the World Eaters Harpoon thingy whatsitcalled -you know, that traditional thing. Dammit, the name eludes me, but you must know what I mean!
And Augustus was perfectly right, of course: I really needed to build an Armiger-sized Ursus Claw harpoon!
I had already used the idea on my second World Eaters Contemptor, Raud the Hunter, a while ago, albeit at a smaller scale:

So for the sake of visual consistency, one objective would be to make the weapon resemble the Ursus Claw on my Contemptor, so they would at least seem to be variations of the same weapons system.
Now when it came to actually building an Armiger-sized Ursus Claw, Talarion’s approach to building a lance weapon for an Armiger served as invaluable reference material. So between his version and my own-Dreadnought sized proof of concept, here’s what I came up with:
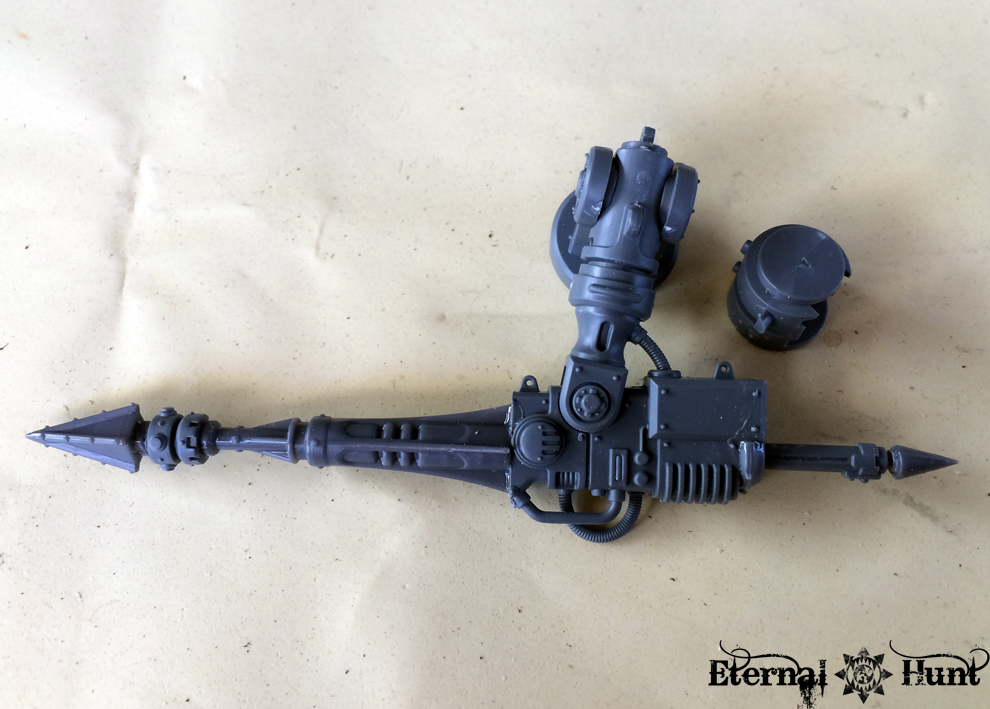
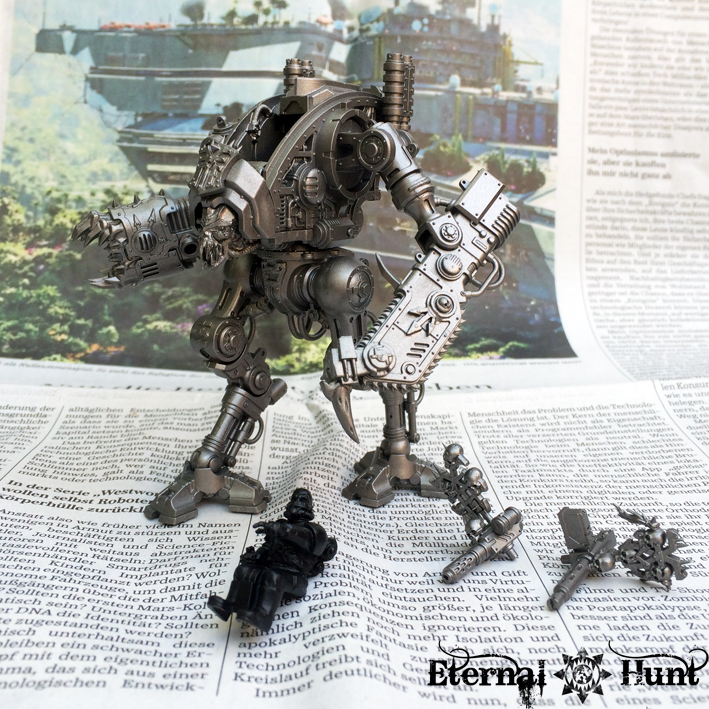
This was just the basic setup, mind you, with very little chaotic decoration in place, and the weapon also still lacked the drum-fed chain attached to the harpoon (the drum bit is already visible in the picture, though). That being said, it was also a pretty simple conversion, really, spliced together from the Armiger’s stock chainblade arm and a couple of additional bitz.
In case you want to reproduce the design – or build something similar – here’s a mini-tutorial for you:
Tutorial: Building a Knight Armiger harpoon arm:
First of all, here are the bitz you will need (keep the red parts for the conversion, while the grey parts go back into the bitzbox):Â 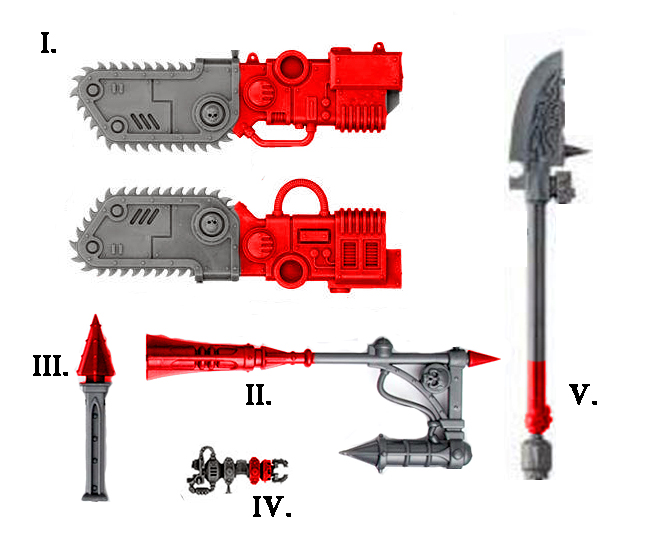
- I. the stock Armiger Warglaive chainweapon arm — just carefully get rid of the blade (and of that one small, greyed-out area towards the back!).
- II. a lamp post, either from the 40k basing set for big models or from the old City of Death terrain. I used two parts from this piece, although the foot is by far the more important one, as it makes up most of the actual harpoon.
- III. The spiked tip from another small terrain piece, that is – again – available both in the aforementioned basing kit or the City of Death terran kits.
- IV. a small piece from the Adeptus Mechanicus Kataphron kit — I only really chose this for visual balance and because it makes the harpoon look as though it might actually be a bit more sophisticated (and able to carry an electrical current, for instance).
- V. The shaft from the Blood Angels Librarian Dreadnoughts psi-weapon — although there are probably many bitz that would work just as well. You could even use a piece of plasticard to fill the same role.
All you have to do is to carefully line up these bitz and glue them together (of course you can always pin the entire thing, if you want to make sure it’s ultra-straight and stable): I’ve made you a diagram about what goes where:
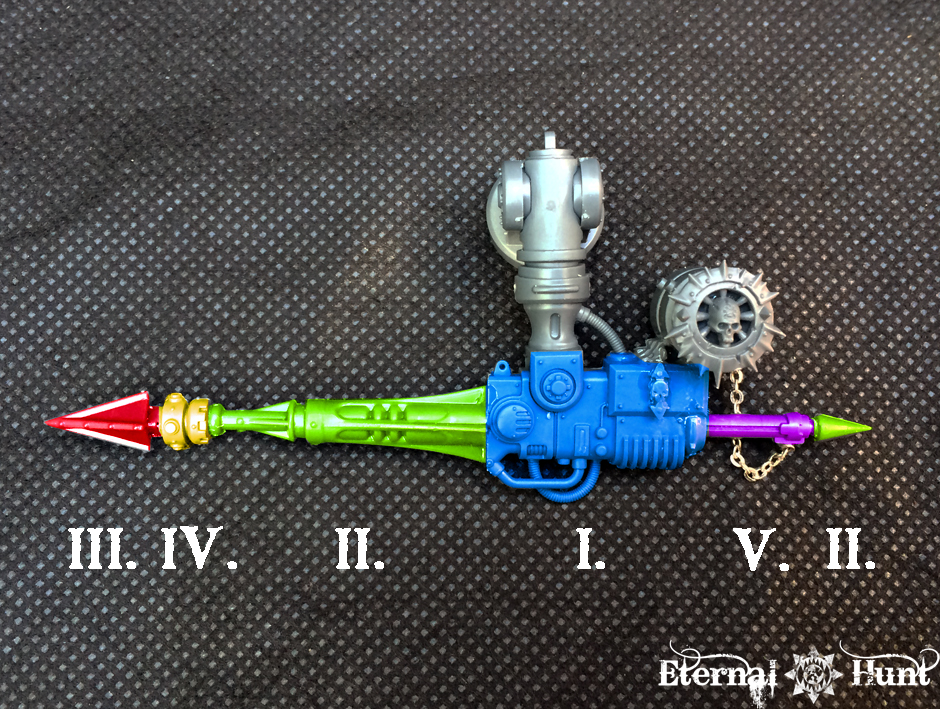
As an aside, I actually love the fact how part IV. – coincidentally – mirrors a very similar part on the Knight Valiant’s Thundercoil Harpoon, even though my design predates the release of the new model by a couple of months 

I also chose to include a chain drum, made mainly from a leftover Imperial Knight weapon part (if I recall correctly). You can basically use any round, hollow shape for this, though — even any kind of (half-)barrel might do. I added a piece from a WFB plastic spear to the centre of the drum, then carefully wound some Gale Force Nine model chain around it and attached the end to the harpoon, in an attempt to actually suggest a mechanism.
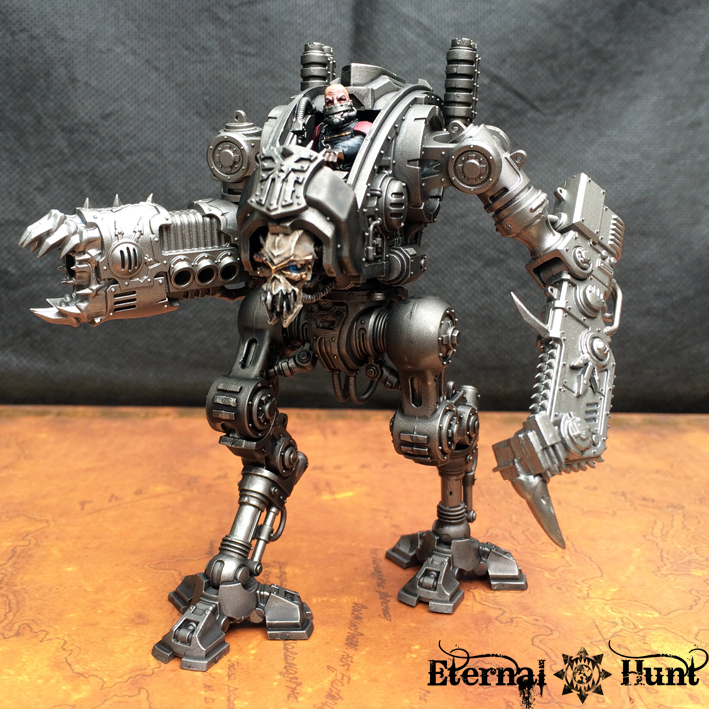
Here’s a look at the finished arm, with a bit of chaotic decoration in place.
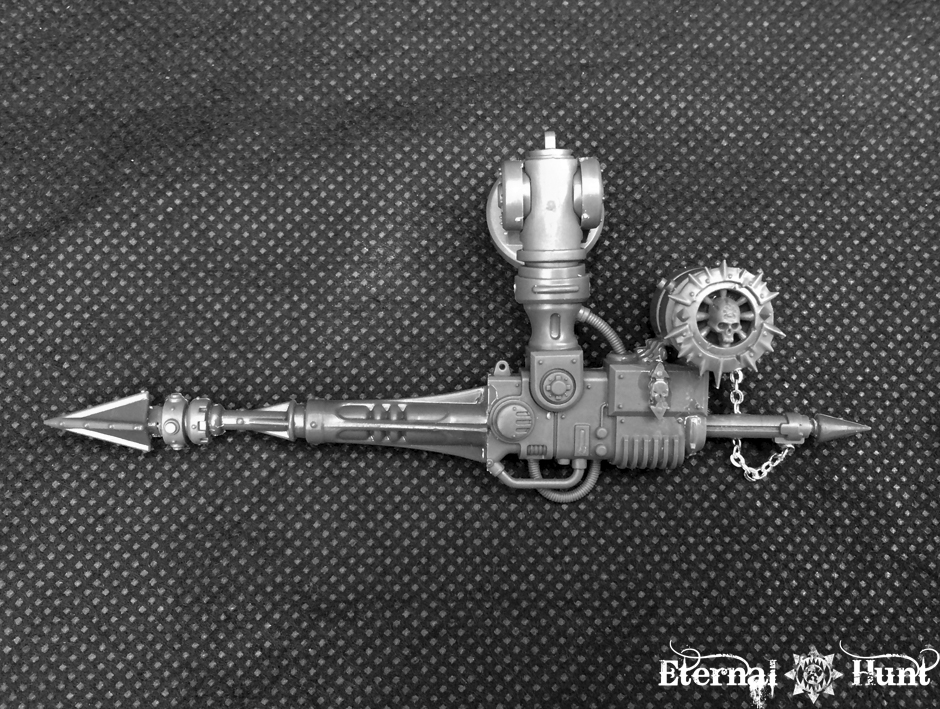
Two additional remarks about the conversion:
One, I do realise a more ornate, spiky tip would probably have made for a more Khornate look, but I kinda wanted to retain a certain sense of internal consistence across my collection. Well, that and I also like the idea that the weapon itself is so blunt and brutal that it’s mostly designed for efficiency, and less for show. If you decide to build your own harpoon/lance weapon, however, swapping in a tip of your liking should be the easiest thing in the world.
Two, elsewhere on the blogosphere, it has been pointed out how the chain mechanism could never work from a mechanical perspective. That is probably correct. I went with a setup that seemed at least a bit logical to me, while also looking visually balanced. But I definitely did not get into the actual engineering of a working mechanism, so feel free to make any necessary adjustments on your own version, especially if you have a better grip on mechanics than I have!
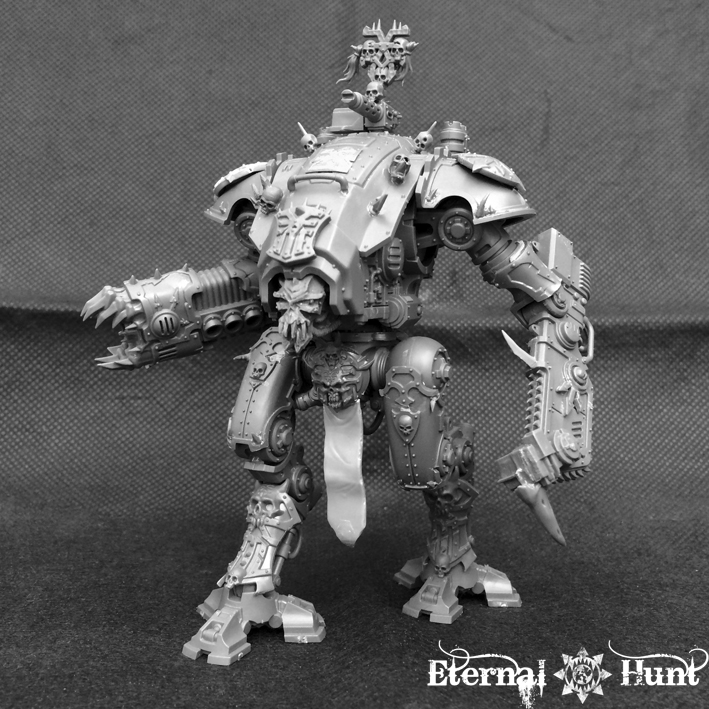
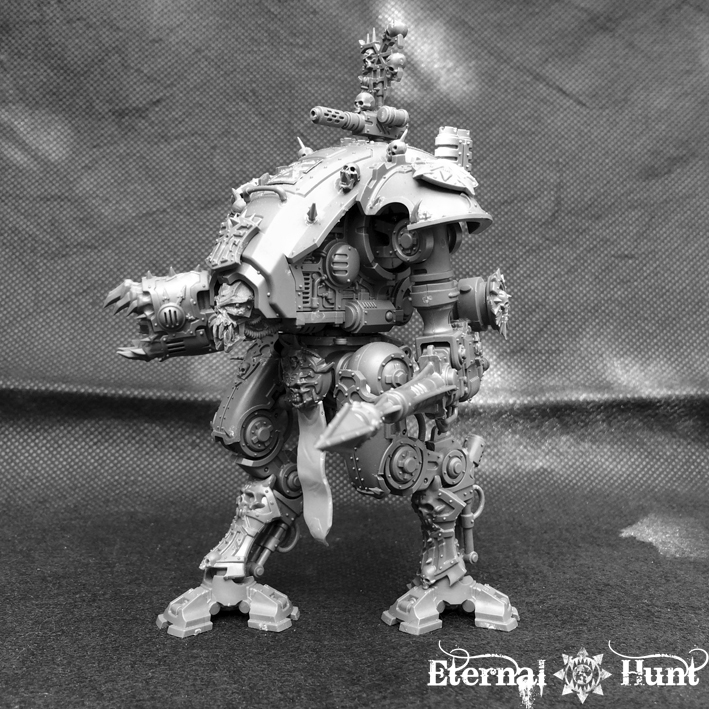
If nothing else, I do think the finished arm looks pretty cool when mounted on an Armiger:
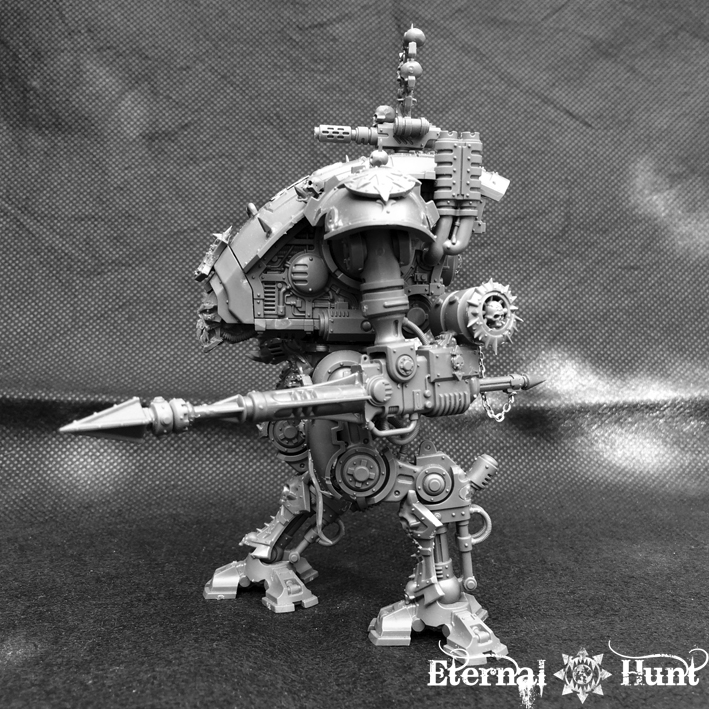
Here’s a closer look at the chain and mechanism:

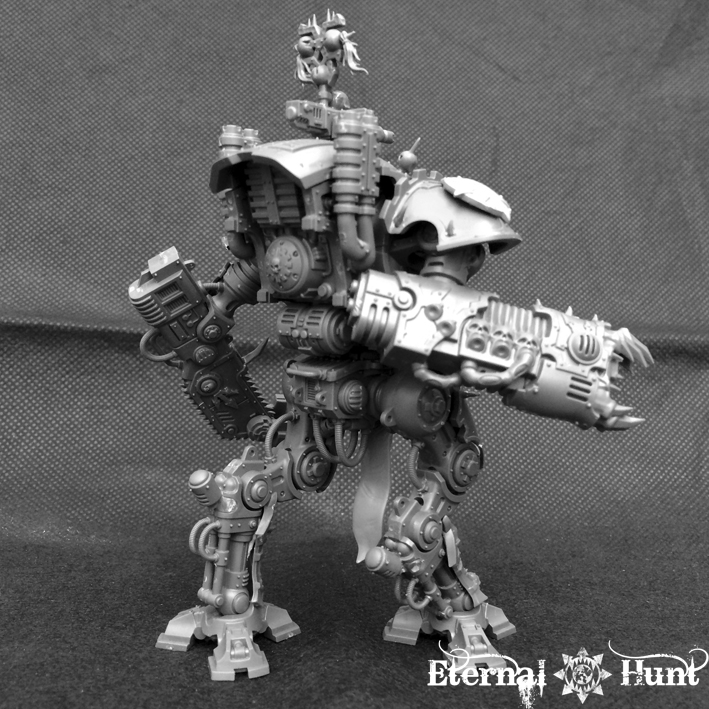
Since my first converted Armiger will be going with the chainsword arm shown at the beginning of this post, the harpoon arm serves as a bit of a teaser for the second Armiger I am going to convert. That being said, I’ll definitely leave the arms interchangeable, so they can be swapped between models as needed.
II. Gearing Up!
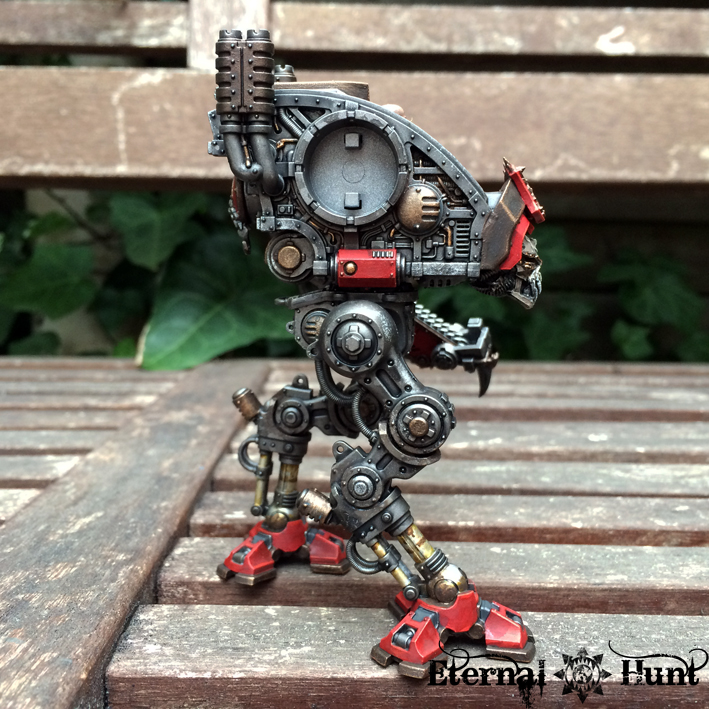
The building optional Ursus Claws notwithstanding, there was still the matter of the unpainted Armiger to deal with — even moreso since I have vowed the model as an entry for this year’s ETL event over at The Bolter & Chainsword. So it was time to finally get this bad boy painted. Just to remind you, here’s what the conversion looked like:

Unlike the last time I had to undercoat a Knight, there were no spraying mishaps this time around, fortunately enough, so here’s what I started with:
Now the first painting session was mostly spent on the – rather thankless – task of darkening down the body with black wash:
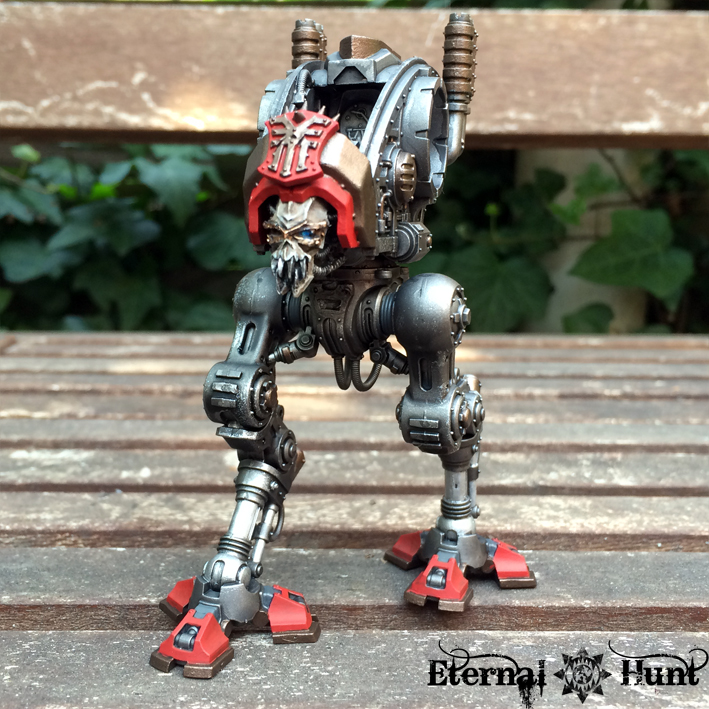
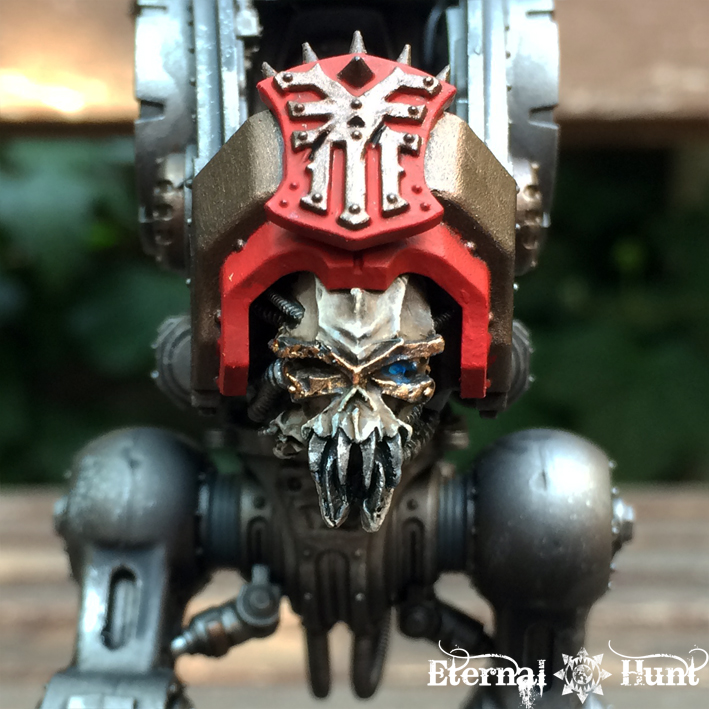
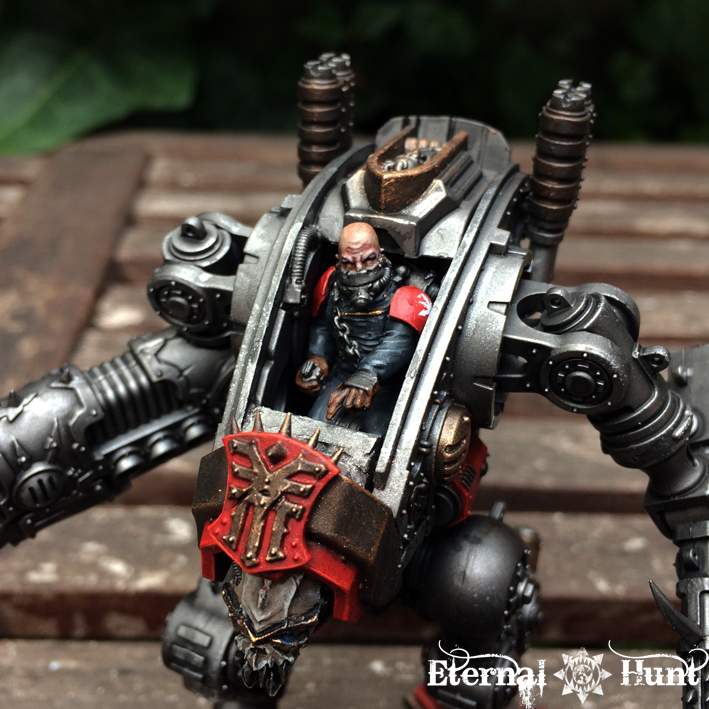
In order to make things a bit more challenging – and rewarding – for myself, however, I did sneak in some painting on the Armiger’s head (which I finished in one go)…

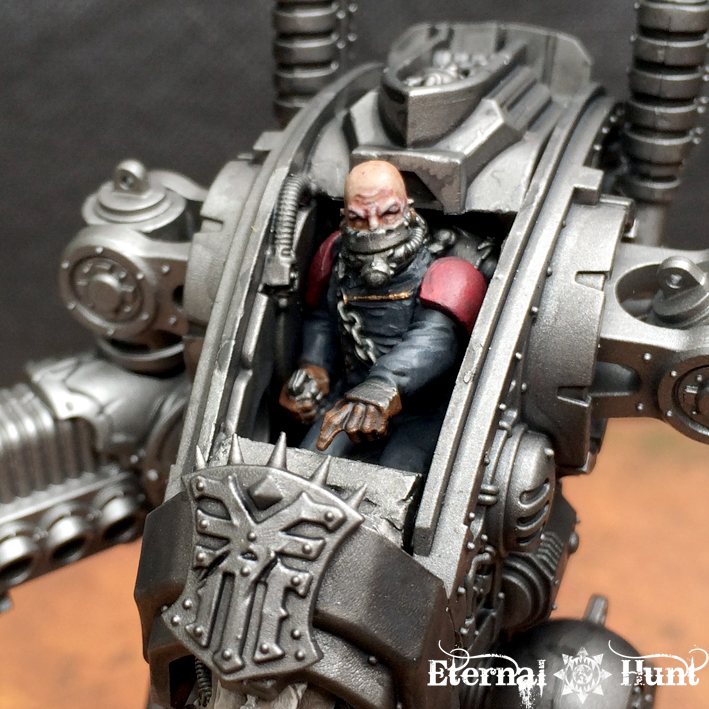
And on the pilot, laying down the base colours and the first pass of washes:
Since then, the paintjob has mostly consisted of chipping away at the model one area at a time so far. Starting with the Armiger’s metallic base structure and leaving the armour plates for later seemed, once again, like the obvious way to go.
So here’s the Armiger’s “skeleton” with most of the base colours blocked in:
While this may not seem like riveting stuff, the extra depth provided by the bronze detail should make quite a bit of difference on the finished model, I hope. Plus this also allowed an early idea of how the bone faceplate would eventually contrast with the red armour:
I’ve learned from JeffTibbetts’ absolutely amazing “Queen Bee” project that it pays to take some extra time on a Knight’s metallic skeleton, adding areas of grime, scratches and all kinds of wear and tear for that extra bit of realism (or rather, plausibility) and texture — true, most of it will be covered up by the various armour plates later on, but being able to glimpse something that resembles an actual, working machine underneath it all makes the whole war machine, preposterous as it may be, more grounded in realism.
With this preamble out of the way, here’s a side view at the mostly finished “skeleton”, showing off some of the carefully applied dirt, grime and lubricant
The same process was then repeated on the arms, finally making the model look as though it were actually going somewhere:

And the pilot has also been finished (after another round of highlights and the application of a decal to his shoulder pad):
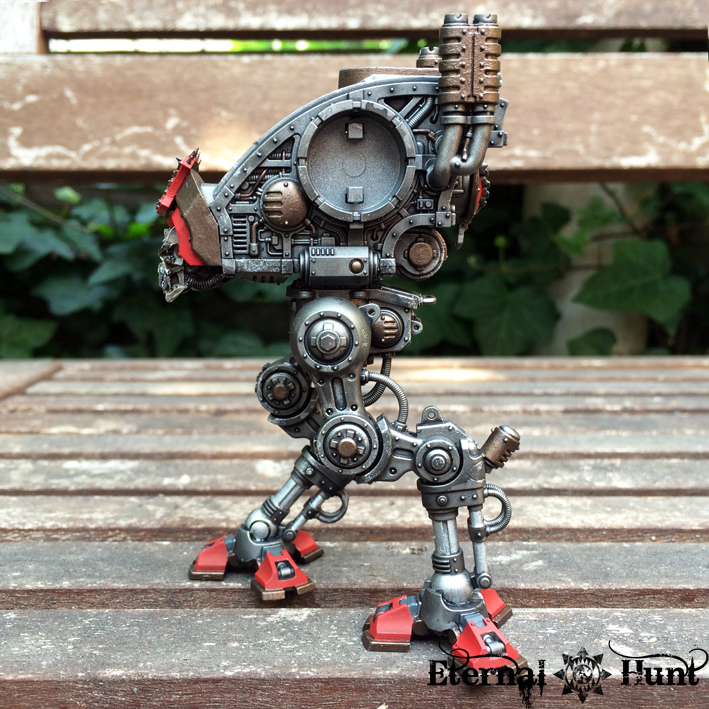
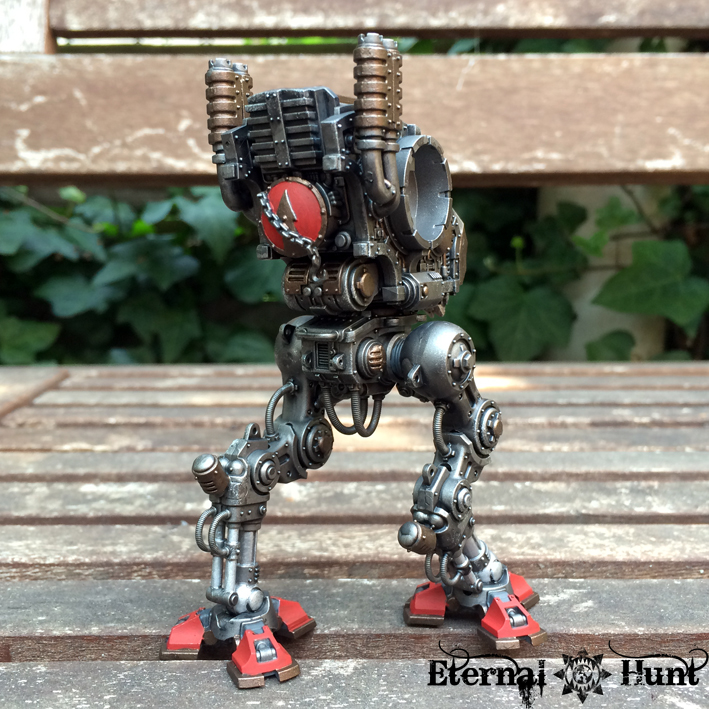
So here’s the current status of the model:

As you can see, the arms are basically done at this point — including the plasma “special effect” on the right arm, obviously. This also means that, with the exception of a bit of cleanup and some minor finishing touches, the Armiger’s “skeleton” is now finished, and I’ll be focusing on the armour plates next.

In fact, here’s a sneak peak of the model with the undercoated top carapace provisionally mounted in place:

The ETL event ends on August 1st, so that leaves me with about a week to paint the rest of the armour, perform all the necessary cleanup and add the finishing touches, then maybe add a base — while I am definitely going to base the model with all bells and whistles, it is not something that’s required for finished models that are part of the ETL, so if I have to cut some corners, it’ll be there. All in all, in spite of my general laziness, it seems like a realistic task. However, my neck of the woods is also currently in the midst of a heat wave that renders painting more complicated than it needs to be — so wish me luck!
Oh, and in addition to being my first (and probably only vow) for this year’s ETL, this guy also counts as an entry for Azazel’s “Jewel of July” challenge.
So keep your fingers crossed for me, as I brave the hot weather in an attempt to get this guy finished in time! It goes without saying that I would love to hear any feedback you may have! And, as always, thanks for looking and stay tuned for more!