I won't be taking many pics as my stuff is only painted as I brought majority of it second hand at a local wargames fair - got some cracking deals. And Shaun's stuff is undercoated at the best. I am pretty sure you do not want to see grey every where or just random paint jobs.
Eldar 'Iyanden' - 2,000 points
HQ
Spiritseer (conceal/reveal & protect/jinx)
Troops
5 x Wraithguard w/ Wave Serpent - Serpent w/ twin-linked scatter lasers & holofield
5 x Wraithguard w/ Wave Serpent - Serpent w/ twin-linked scatter lasers & holofield
5 x Dire Avengers w/ Wave Serpent - Serpent w/ twin-linked scatter lasers & holofield
5 x Dire Avengers w/ Wave Serpent - Serpent w/ twin-linked scatter lasers & holofield
5 x Dire Avengers w/ Wave Serpent - Serpent w/ twin-linked scatter lasers & holofield
5 x Dire Avengers w/ Wave Serpent - Serpent w/ twin-linked scatter lasers & holofield
Fast Attack
Vyper - shuriken cannon
Vyper - shuriken cannon
Heavy Support
2 x War Walkers - 2 x scatter lasers each
2 x War Walkers - 2 x scatter lasers each
2 x War Walkers - 2 x bright lances each
Tau - 2,000 points
HQ
Commander - missile pod, plasma rifle, stimulant injector, multi spectrum sensor suite, puretide ingram chip & irdium armour
2 x Bodyguard - 4 x fusion guns
Ethereal
Elite
Riptide - ion accelerator & stimulant injector
Riptide - stimulant injector
3 x Crisis Suits - 3 x missile pods & 3 x plasma rifles
2 x Crisis Suits - 4 x fusion guns
Troops
10 x Fire Warriors
10 x Fire Warriors
10 x Fire Warriors
Fast Attack
10 x Pathfinders
10 x Pathfinders
Heavy Support
3 x Broadsides - high yield missile pods & 3 x seeker missiles
3 x Broadsides - high yield missile pods & 3 x seeker missiles
Game: vanguard strike & emperor's will - night fighting is active
Deployment
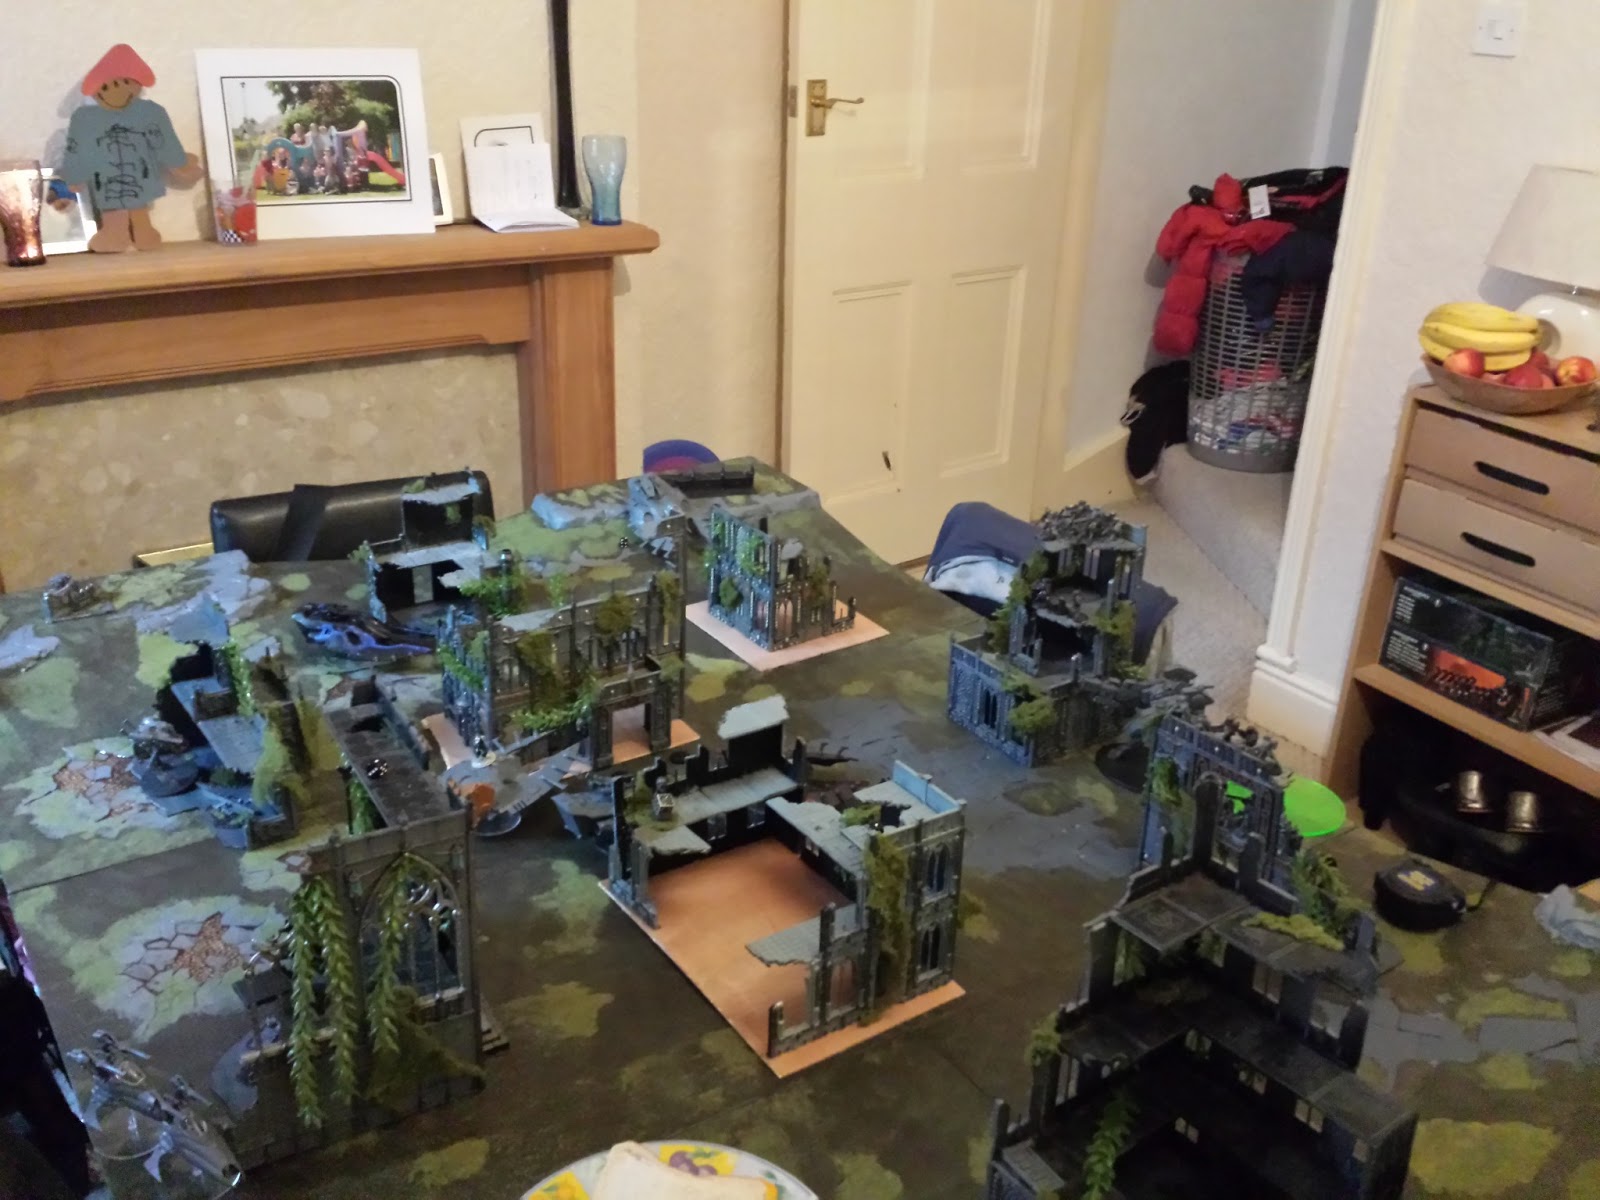
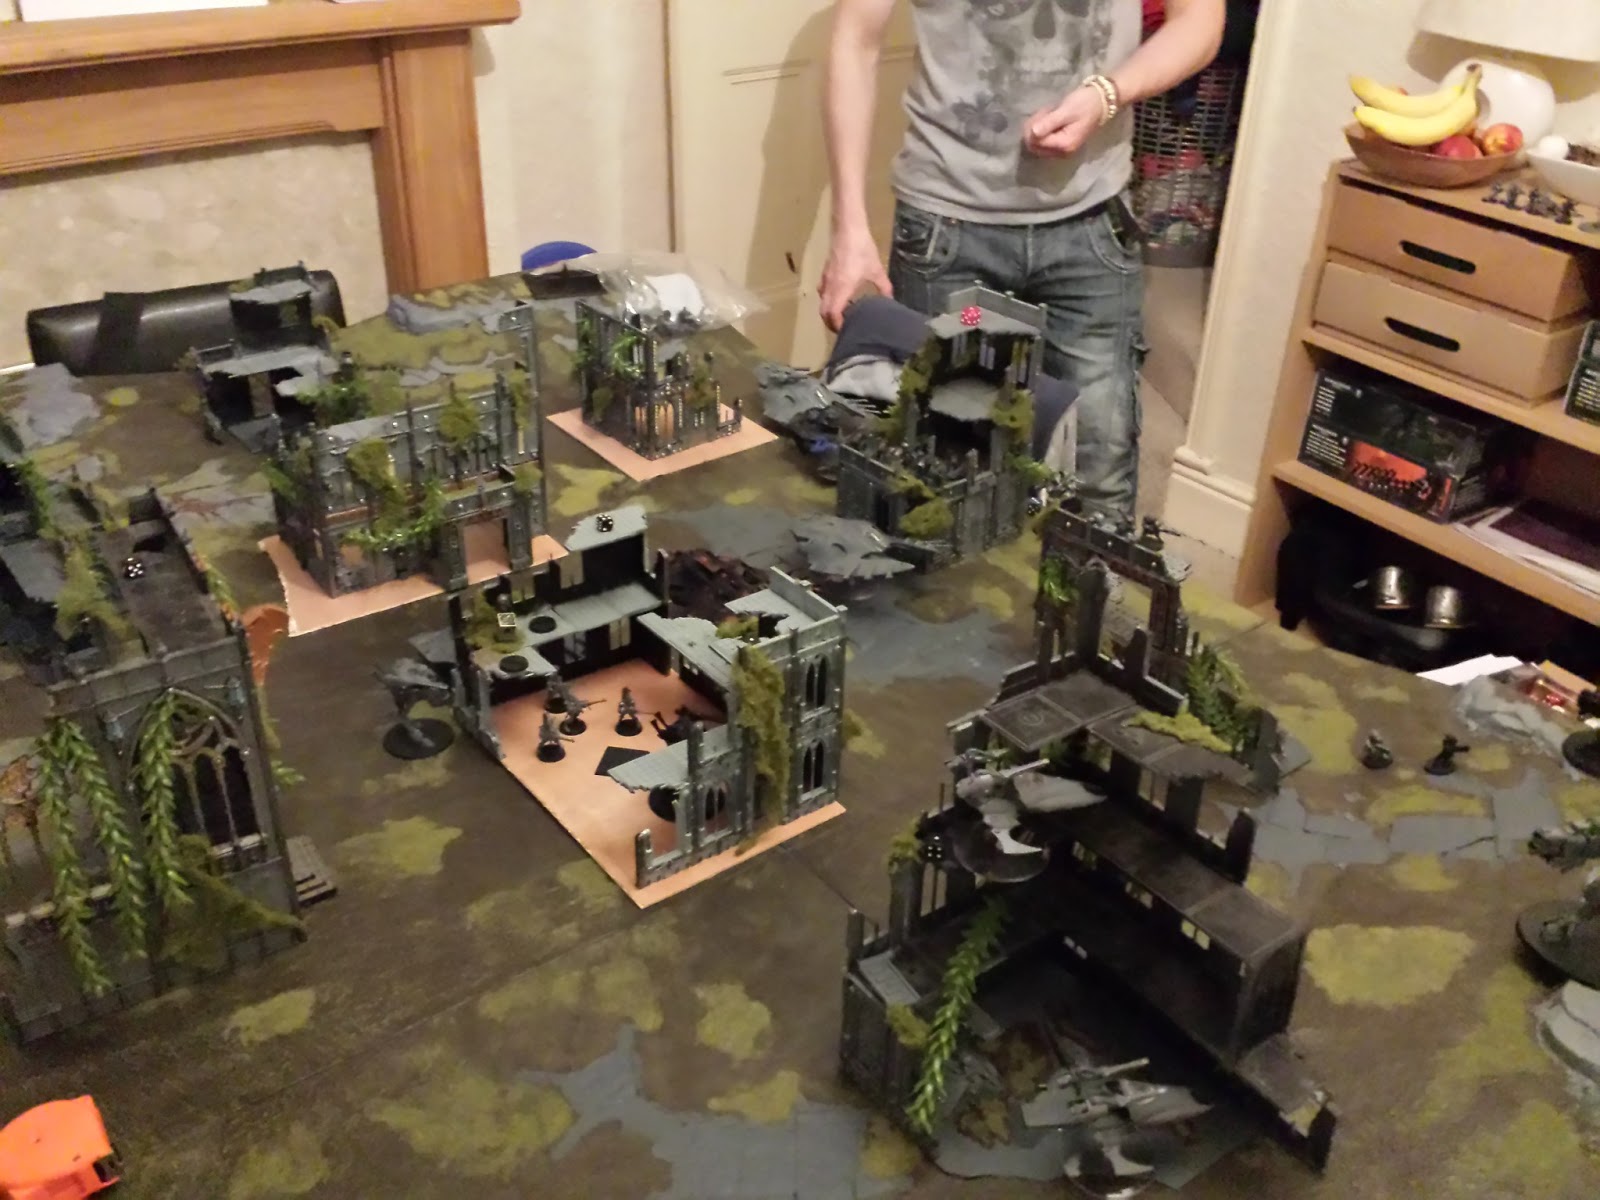
Shaun won the roll off for both both side and deployment, he picked the top right side. He deployed in the tower ruin a unit of Fire Warriors and Pathfinders with his Commander and Crisis Suits behind for support. In the next ruin (this is where the Tau objective is) are two Fire Warrior units, the Ethereal and supporting Riptide. On the hill top right is the Broadsides, at the bottom of the hill using the ruin for cover is the other Pathfinders and Riptide. The fusion-suits are in reserve.
I scatter my forces and have them placed all behind terrain to block LOS and also keep out of range of the high yield missile pods etc. Behind a large ruin in the centre I place four Serpents - one has my Spiritseer in with a unit of Wraithguard. On my table edge I put the other two Serpents behind a ruin with a unit of Scatter-Walkers inside the ruin. Moving along my table edge to the right I place the other two War Walker units in the shrine ruin along with both Vypers for support. Pretty much my entire army has LOS blocked os is very hard to see.

* Tactical Notes
Gauging on distance I reackon that all units will be out of range first turn shooting, though it is possible the Pathfinders and Fire Warriors in the ruin can draw LOS to shoot, though Fire Warriors will do nothing to my Wave Serpents.
My plan is to flank up to the shrine ruin and just destroy everything in front of me. I'll carry on sweeping up the board and pick on units based on target priority.
Pathfinders will be number one target priority as these can provide Tau's buffs but more importantly can take away cover from my funky holofields.
Broadsides will be next, their salvos of HYM stand good chances of taking out my Serpents. Due to range it will be difficult to shoot at them effectively; I'll use Lance Walkers to gib them or with any luck Serpents to pin them.
Commander unit and Riptides will be next, both stand ok chances of taking out my vehicles. I'll use the Wraithguard to deal with both of these units while the Vypers can gang up on a Riptide with some War Walker support.
Turn 1
I attempt to seize as letting a shooting army go first is never good idea even if you have LOS mostly blocked, I fail.
Tau; Riptide supporting the Broadsides comes down the right board edge ready to gun down a Vyper. Some movement from the other Riptide as it flanks across the back of the ruin where the objective is.
Shooting; Pathfinders in the ruin can draw LOS on a Serpent, they fire full house of markerlights but only hit four. Unfortunately nothing else can see the Serpent to draw LOS, so Shaun calls three seeker missiles from one Broadside unit; one seeker missiles the other causes a glance. Riptide fires into War Walkers in the small ruin by the two Serpents and takes it out. Nothing else can see as cannot draw LOS or is out of range.
Eldar; Vypers come out to play and target the Riptide coming down the right flank while War Walkers come out with Lance Walkers targeting the closed Broadside unit. Serpents move up the centre with two moving up behind the large ruin they was deployed behind.
Shooting; Vypers fire into the Riptide and score four wounds, Shaun rolls very unlucky and fails three saves and fails all feel no pain - happy days for me. Lance Walkers target the Broadsides, though they get cover thanks to a ruin blocking them, I manage to instagib one of them. Scatter Walkers and Serpents dakka into the Pathfinders in the tower and erase them. I put some shots from one Serpent into the other Pathfinders but only kill two. I move both Wraith-Serpents flat out to get them into range, one lands in terrain and fails dangerous terrain test - Serpent is lost :(
* Tactical Notes
I am off to a good start; I have taken minimum damage thanks to deployment, which has blocked LOS and given me excellent cover. All I have lost is a War Walker and the odd hull point or two. Tau on the other hand have lost a unit of Pathfinders, taken some damage on another unit and has a barely alive Riptide left after some terribad rolls.
Next turn I'll continue the attack and flank up into Tau's grill; I'll blast all Fire Warriors and hopefully kill some troops and if possible I'll blast the Commander's unit. The wounded Riptide I'll try and take out with Vypers while the Lance Walkers can pick on the same Broadside unit again.
Turn 2
Tau roll for reserves and one unit arrives and lands bang on target behind my Serpents moving up the centre between ruins.
Tau; Commander unit moves up towards a Serpents I have moved towards the tower ruin. Wounded Riptide comes down to shoot some Vyper will the other Riptide hangs about near the Ethereal.
Shooting; Pathfinders fire and light up a Wave Serpent at the front with three markerlights; unit of Broadsides fire into this pumping up their ballistic skill and take away my cover, though all Shaun can do is knock off two hull points. Riptide overcharges the ion accelerator and blasts the exposed Wraithguard, the shot catches the now damaged Serpent and another, though does nothing to them while two Wraithguard die after failing cover saves. Other Riptide shots into a Vyper, rolls terribad and scores two glances and I save one thanks to the ruin. Fusion-Suits fire into the rear of a Serpent, they wreck it and an angry Dire Avenger unit comes out with shuri catapults aimed. Fire Warriors with the Ethereal on the upper floor fire into the Avengers, Shaun rolls rubbish and I pass all armour saves. Warriors in the tower and unit with the Ethereal fire into the Wraithguard though fail to finish them off.
Eldar; I move a Serpent in close to the Commander's unit, Avengers bail out into area terrain behind the vehicle. Another Serpent comes up to support, Avengers bail out. Wraithguard Serpent moves 6" and the Wraithguard and Spiritseer bail out, I do cast protect before hand. War Walkers come out to play while the Vypers trade places and hug cover.
Shooting; Vypers dakka the wounded Riptide and polish it off while the Lance Walkers instagib a Broadside from the already depleted unit - Broadside fails morale and runs off. Wraithguard fire on the Commander's unit and instagib the lot of them except the Commander, who comes under fire from shuri from two Avenger units - passes all cover/armour saves. Depleted Wraithguard fire into the fusion Crisis Suits, kill one and Avengers take a wound off the other - Crisis Suit fails morale and falls back. Serpent's dakka into the Pathfinders and two remain - they fail morale. I put remaining scatter lasers and Serpents into the Fire Warriors in the tower - fail morale.

* Tactical Notes
Rolling up the Tau's flank seems to be doing well as anything which stands before me gets mostly destroyed. This turn has been good for me as I have taken very little damage and have taken out the Commander's Crisis Suits, Fusion-Suits Pathfinders, Broadsides, depleted Fire Warriors and killed off a Riptide.
Next turn I'll mount the Avengers back up and press on the Commander and the Ethereal - if I destroy Shaun's troops then he cannot claim his objective and stands little chance of reaching mine based upon his position.
Turn 3
Shaun rolls for reserves and the second fusion unit fails to arrive.
Tau; Pathfinders fail morale and continue to fall back while the lone Riptide walks off the board. Depleted Fire Warriors regroup though. Commander falls back towards the tower ruin while Riptide moves to give the remaining Broadsides some cover. Fusion-Suit carries on walking back.
Shooting; Broadsides attempt to fire at my exposed Lance Walkers as battle focus didn't get me back into terrain, they are out of range and instead fire at a Serpent, holofield saves. Fire Warriors who regrouped snap fire into the closed Avenger unit who just bailed out and kill three - unit passes morale. Riptide charges the ion again and fires at the exposed Wraithguard and destroys the entire unit except the Spiritseer. The Commander then fires at the lone Spiritseer and instagibs him.
Eldar; both Vypers move up to a large ruin on the right flank using it for cover, they move flat out btw. Serpents move up along side the tower ruin while Avengers re-mount, though the depleted unit I just move into terrain as too far away to move into their Serpent due to terrain rolls as I moved them into terrain thanks to battle focus.
Shooting; Scatter Walkers open fire along with Serpents and destroy the Ethereal's unit and half the other unit in the same ruin - they pass morale. Lance Walkers instagib two Broadsides even though they get cover thanks to the Riptide - unit passes morale.

* Tactical Notes
Ok, Tau have a two troop choices left and one is heavily depleted, if I can kill the depleted unit then the other one will require at least two turns to reach their own objective.
Next turn I'll fire on the Broadside if my Lance Walkers are left while Serpents will tackle the Commander and the remaining troop choices.
Turn 4
Fusion-Suits arrive, Shaun gets brave again and puts them behind two Serpents flanking up by the tower - he lands on my Serpents, I say "do not roll a 1" - guess what he rolls? Yup, a 1, good by Fusion-Suits.
Tau; Commander falls back along Tau table edge using the shrine ruin to block LOS from majority of my Serpents and War Walkers. Pathfinders refuse to go off the board, though not a threat so no biggy. Riptide goes to deal with the two Vypers, it does try to use the reactor for shield and fails and loses a wound.
Shooting; Riptide shoots a Vyper though I pass saves. Broadside blasts the Lance Walkers and they are both totalled after I fail to make a single save from missile salvos. Commander makes a futile effort shooting Wave Serpent.
Eldar; Vypers use the ruin to claim cover while eyeing up the Riptide. Serpents press on the attack and move down while War Walkers just hang about.
Shooting; one Vyper fires into the Riptide and takes another wound off it, I decide to fire the other into the Broadside though fail to finish it off thanks to cover from the ruin against bladestorm wounds. I blast the depleted Fire Warriors on the objective and Shaun does well with saves. I fire Serpents into the Commander and he finally takes a wound after many good rolls thanks to feel no pain.
* Tactical Notes
Not a as good turn I had hoped for. I really wanted to take out the depleted Fire Warriors and the remaining Broadside, but missile salvo got my Lance Walkers and saves were strong for the Fire Warriors. On a good note a unit of Fusion-Suits has been destroyed via the deep strike mishap table so all is good.
Next turn I just need to press on the attack and wipe out troop choices while using an Avenger unit to get me first blood.
Turn 5
Tau; Riptide comes down the hill trying to avoid giving cover to the Vyper, though due to the height of the Riptide the Vyper is lower and the floors of the ruin cover 25%. Commander again falls back towards the objective.
Shooting; Fire Warriors blast my Avengers on my objective in the centre ruin, I go to ground and two dudes remain who pass morale. Doesn't matter if they did fail as the two Wraithguard are sitting on it too. Riptide dakkas the Vyper and again I do well with cover saves. Broadside fires into the Scatter Walkers in the centre ruin, cover saves are doing good for me tonight :) Commander blasts a Serpent though fails to damage it.
Eldar; Serpents move up with an Avenger unit bailing out close to the tower base, I'll shoot them at the Fire Warriors in the tower then battle focus and get linebreaker.
Shooting; Vypers fire into the Riptide and drop it down to a single wound. Wave Serpent dakkas the remaining Fire Warriors who are on the Tau objective and wipes them out. Scatter Walkers fire into the Broadside and kill it off while remaining units including Avengers by the tower fire into the last Fire Warriors and Commander, Fire Warriors survive and Commander has a single wound left after some awesome feel no pain rolls.
At this point we call the game as I have my own objective, first blood and linebreaker and it would take Shaun two turns to reach his objective which his troops would be shot to bits as they cross from terrain piece to terrain piece.
5-1 to Eldar, crushing victory!
Summary
Interesting game against Tau. I wasn't sure if the missile spam would succeed due to weight of fire or fall flat on it's face. I think deploying out of range on turn 1 helped me get in that alpha strike and after that holofields make the saves as I hugged terrain like a mofo.
Shaun played reasonably well, but his list was illegal as not enough troops for double FOC on the elites. Also the Broadsides would have done better deploying more forward and in terrain as this at least would give them some cover. With them being closer then they would have used the Ethereal's leadership bubble. Also, while not use in this game, the Broadsides had no skyfire - this is something they need badly as Shaun only has weight of fire to deal with enemy flyers.
I think Shaun's dice could have been a lot better to start off with - three failures for the Riptide! Though his Commander was shit hot near the end on saves and the ion hit on target every time except once.
The big mistake I made myself was not casting conceal on the Wraithguard and then moving them into cover when I bailed them out the Serpent. The reason I didn't move then into a ruin was because I wanted them to nuke the Crisis Suit unit (which they did well) and wanted them in range. I did forget about the ion in excitement of instagib :)