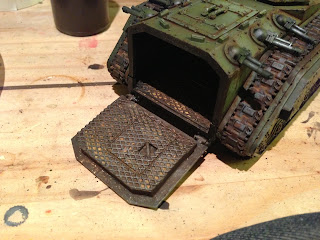
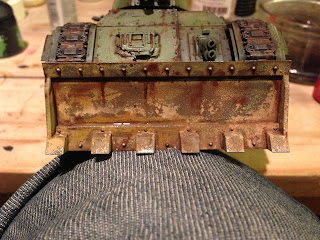
On with the show! This part will explain how to get the weathering blended nicely into the tank surroundings and briefly cover how I use weathering powders, until you achieve something like this!
1: Gloss and leaking Oil. I use Vallejo Gloss varnish for this, its exactly the same as Johnsons Klear that unfortunately no longer exists except in boxes under the stairs of professional model painters.
Once the oil streaks we painted in from part one of this tutorial are dry (shouldnt be more than 30mins -1hour depending on how much oil paint you used.) We start to apply Gloss over the top. Ive added a little black oil paint to the burnt umber to give an engine grease look to it.
You can see in the picture above that a milky residue is left over, don't worry about this. It soon fades and your left with the result.
And here is the dry result. Ive not put it everywhere ive put oil paint as that would stop these parts looking so unique. My reasoning is that these sections of the track would be unscrewed to grease the tracks from the inside, thus lots of residue. surrounded by older dryer residue around it. A decent result.
2: Tracks. This section took a lot of experimentation. So im just going to show you my final result and bullet point the steps I took to get there.
- Black undercoat.
- Tin-Bitz mixed with gunmetal silver as next layer, total coverage.
- Wash of nuln oil GW ink.
- Dry brush of Gunmetal mixed with Doombull Brown.
- Light smattering of Light Earth weathering powder from Forgeworld mixed with water.
- HEAVY LAYER OF NULN OIL.
- Dry brush of 50/50 mix of Gunmetal and Chaos black.
- Apply Dry Mud weathering powder between track segments.
I genuinely think you can get the same result by just doing the last 3 steps of this but maybe you wont get the depth of rust and old used tracks as is achieved here. Good luck! And please feel free to get in touch if you have a better guide than this for tracks.
3: Weathering powders.
This section is more about how I have come to use these amazing tools than a tutorial. Buy all of Forgeworlds weathering powders immediately. They are beautiful. Dip a frayed brush (to pick up the powder) into the pot and tap your powder onto your pallet, mix with a brush full of water and just paint it on. Once it drys it looks like this. Add more water to dilute once its on the model. The pictures below are before and after I ran a wet toothbrush over it.
Too heavy.
Just right!
4: Peeling paint. This bit gets technical but its worth it's weight in gold. Lifted nearly verbatim from Forgeworld masterclass book this gives a beautiful result.
- Undercoat black.
- A mix of Gunmetal silver and darker silver are painted all over in a patchy way. (See image below.
- Coat in GW purity seal. Leave to dry.
- Coat in shop bought hairspray. Leave to dry.
- Airbrush your chosen colour, I picked a dark yellow. Leave to dry.
- Dip your brush into water then lightly rub onto surface. BAM! peeling paint.
Here Ive added in a load of the techniques Ive gone over in the last few sections, lots of forgeworld weathering powder, oil leaking, and gloss varnish to give a wet mud effect. Just went to town on this beast.
The final touch is running an HB pencil along the raised edges of the metal. This gives the tiny highlight that might have been lost in my excitement over the dozer blades. Who doesn't like massive dozer blades!?
5: Finally a quick run down of a couple of tools I've used over the last two tutorials.
Bit of card with a corner cut off to use as a Mask for airbrushing.
Zest-it to use instead of white spirit. It's cheaper, easier to work with and it smells like oranges! I squeezed a little Burnt Umber into the bottle on the left and added a good inch of Zest-it. This is the most perfect brown wash you could ask for. It's what the dutch masters used.
And the right 3 colours are the only ones used on the tank if you want to replicate my colour scheme.
They are from Vallejo Model Air range. And work great straight from the bottle into an airbrush or pallet.
Well I hope this has been helpful!
Cheers for reading!


