Last night I sat around trying to write up the next Skaven article. I intend for that article to discuss the ranked troops in the army book and suddenly I experienced a revelation, "What if people reading that article don't know the bases of 'Ranking Up'"? I then started incorporating basic tactical sense about the various formations that are commonly found on the tabletop until I outlined an article that would dwarf War and Peace. Then common sense intervened and I realized I could just strip out the ranking up basics and toss them into an article of their own. So that's what I intend to do. Let's take a look at the basics of ranking up infantry. We'll cover the various formations as well as their strengths and weaknesses and when they are most appropriate on the tabletop.
Quick note- all the formations discussed here are assuming a unit of infantry on 20mm bases. So no cavalry, monstrous infantry, skirmishers, or chaos warriors. For 25mm infantry the same tactics apply, just realize the numbers in a rank may change with the larger base size.
Formations
"The Bus"
The Bus Formation is aptly named as the formation consists of a minimum frontage of five models and as many ranks as possible. The number of ranks usually far exceeds the maximum rank bonus modifier. This formation is commonly used to hold enemy units in place (referred to as tarpitting). These troops are often cheap and/or cost-effective and pretty terrible at combat. However, they gain strength with their increased numbers and since they have so many ranks, will usually keep the Steadfast rule for several combat turns. This allows them to keep an enemy unit stationary and open them up for flank charges. The minimum frontage means that enemy units have to line up charges dead on or risk not reaching their target.
While Bus formation units have a great number of bonuses that make them pivotal to many army builds they also possess some inherent flaws. The greatest flaw comes from the formation itself. The increased depth of the unit makes these units much easier to charge in the flank. If charged in the flank they will most assuredly lose combat since most units that deploy like this are weaker troops. Another downside is the general lack of mobility. The deep ranks make it difficult to wheel this unit around, particularly in cramped quarters. Finally, with a minimum frontage placing characters will potentially move command models to the second rank.
Bus formations should only be used with cheap infantry that, while important to the army strategy, are relatively expendable troops. Move them out in front of the army and don't be afraid to let them take a charge. Let them work their magic by locking enemy units in place for a couple turns and maneuver the rest of your units in for flank charges (or to prevent flank charges on the Bus Formation unit.
"The Horde"
Horde Formations are completely new to Fantasy with the advent of 8th edition. The idea is to have a unit with a minimum of ten models in each rank and than as many ranks as practical. This opens up the third rank for supporting attacks. These troops are usually cost-effective but cheap enough to buy in bulk. They should be able to hit hard enough to cause some damage and may not be able to receive a charge well. They often form the "Hammer" to the Bus Formation's "Anvil". The wide frontage also means more models will attack when against smaller frontage units and that fitting multiple characters into the unit will be a much easier task. Often running 10 models wide, this unit's wide front rank can allow for some beardy multi-charges as well, just be careful that the unit charging can handle both units.
Horde formations present a number of problems when used on the tabletop. Their wide-frontage is as much of a penalty as it is a boon and Horde Formation units are easily charged and potentially by multiple units. When charged by smaller units horde formations are not as efficient as some models are "Lazy" and do not contribute attacks despite being in the first three ranks (since they are not in base to base contact). Just as with the Bus Formation, the Horde can be difficult to maneuver around the tabletop and generals must be careful they do not expose a flank when wheeling around terrain. Finally, due to the lower number of ranks many horde formation units will never benefit from Steadfast and a poor combat turn could spell the end of the unit tanks to leadership modifiers.
Horde Formations are best used as offensive units. Hold them back behind the Bus Formations and keep them with good charge angles heading towards those same units. This will allow these units to flank charge whatever the Bus units are holding up.
"Combat Formation"
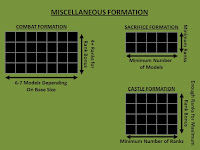
Combat formation attempts to meld the strengths of a Bus Formation while maximizing the number of models that can fight in combat. This formation works well for any type of infantry that is cheap enough to be bought in bulk but the player wants that little extra "oomph". For 20mm based infantry this usually results in ranks that are 7 models wide. This means that against units with a frontage of 5 models, the Combat formation will have four more models attacking or lending support. Against Horde units it will often have more ranks and thus steadfast and will still have more attacks than a traditional bus. Combat formations work well with cheap infantry that still hold some hitting power.
While it tries to meld the strengths of the previous two formations, Combat Formation hold many of the same flaws of both. The increased number of ranks makes the flank exposed while the unit is still difficult to maneuver around the table, albeit less difficult than a horde.In addition the unit will still have less models than a Bus Formation and thus usually not have steadfast against those units. They also risk the danger of being tarpitted and their flanks exposed.
"Sacrifice Formation"
The use of this formation should be pretty evident simply through the name. A minimum size unit with minimum frontage is bought and deployed for a number of reasons. These units are often cheap and expendable and that opens up several options. They count as a drop during deployment and can frequently be deployed before the rest of the army and stall deployment of more important units. In addition they can be used as march blockers, charge redirectors, or roadblocks.
While sacrifice units can fulfill a wide variety of roles on the tabletop they are, by their very nature, extremely fragile. Massed shooting can see them end up as free points for your opponent or worse, they can flee back into your own lines and sow panic or cut off charge lanes. Be very careful about placement of these units and where they move. They are expendable but they still serve a role within the wider army's strategy and nothing is worse than seeing a 30 point unit causing half the army to flee, panic, or other be disrupted.
"Castle Formation"
The castle formation earned the name from the purpose it fulfills on the battlefield. These units offer a character some protection. Often times the character is the general, a battle standard bearer, or a high level wizard that lack the combat skills to stay alive in basic combats. With the castle formation the key is to create a unit with little frontage (5 models wide) and enough ranks to max out the rank bonus but not go over that amount. This unit is not deployed out front, but rather runs behind the rest of the army. It's sole purpose to ensure that the character inside stays alive and provides their bonus to as much of the army as possible for as long as possible. All of this ensures the character is well insulated from shooting and the unit should scare off smaller units with no rank bonus or lesser rank bonus. Additionally, except against Bus Formations and some Combat Formations, the Castle should be Steadfast for at least a turn or two and buy the unit a little time for friends to come to help.
Castle formations suffer from various drawbacks and are usually at a disadvantage against specialist troops/formations. The unit formation is a generalist one and so if a horde charges the unit will take a lot of damage and if a bus charges the castle may win combat but will be stuck in melee for several turns. The other detractor from using this formation is that it can be a "waste" of points. The purpose of this unit is to sit outside of combat and ferry a character around and otherwise act as meatshields. So they really don't add too much to the tabletop unless they are inherently good troops to begin with (Chaos Warriors, Marauders, Savage Orcs, etc).
Reforming
An article discussing ranked formations would not be complete without discussing the options for reforming units during the movement phase. Reforming allows units to shift from one formation into another often at the expense of any directional movement. Canny generals will use this tactic both during the movement phase and during the combat phase.
Movement Phase
Reforming during the movement phase can solve several problems at once. Don't have enough space to wheel around a piece of terrain? Try and reform your unit and play with the ranks and see if that makes the move easier. Worried your opponent will be able to charge your flank/rear in their next turn? Reform to face them. Just remember that no model can move more than twice its movement attribute.
Quick Reform
This ability granted by musicians is the primary reason why musicians went from third class citizens in previous editions to rock stars in 8th edition. This ability allows a unit to test on its leadership ability and, if successful, to reform and still move and shoot. Now, the unit cannot charge when using this ability but this ability can be used to potentially avoid a charge int he following phase or bring a unit that ran too far chasing an enemy unit down back towards the fight.
Combat Phase
Reforming in the combat phase can be beneficial as well. Often times Horde formations, particularly late game, will find their ranks dwindling. It may prove beneficial to switch from a horde formation to a combat/bus formation. Likewise a bus formation may find it to their benefit to switch to a horde formation when dealing with horded troops who are weaker.


